
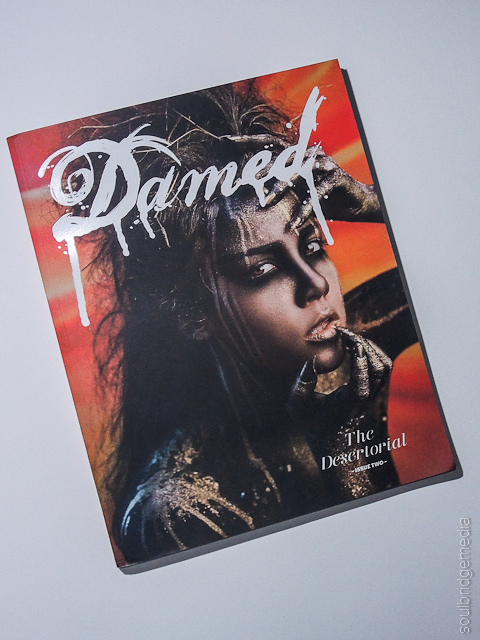
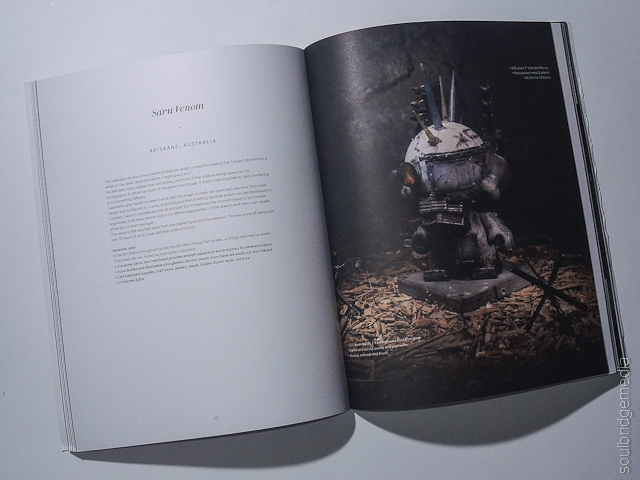
About a year ago you may remember I knocked up this bad boy for the Laced Munny Competition. Since then the folks down at Melbourne pictorial publication Damed Magazine liked it so much they wanted to feature it in their second issue which was focused around post apolcalyptic futures and recycling – which sums up the Diodon Battle Droid perfectly!
We braved endless pigeon poo and dead carcasses to grab a shot for the mag as well.
Issue #2 finally went on sale a couple weeks ago, however being a niche Melbourne publication its only available in selected outlets and directly from their website, so for those that can’t get a hold of a copy we have included the whole waffling pre-editor cut interview below.
If you have any questions, hit us up in the comments or on the Soulbridge Media Facebook page.
—
If you would like to tell me what inspired you to created this piece?
Inspiration for any of my creative stints usually comes from either “haven’t done one in a while” or “never done that before, might give it a try”. I’ve built and painted a few of these in the past but never to this extent. I wanted to give a proper whole hearted shot from initial design and configuration, to prep, to build and finishing and really take my time with it. Like anyone, when youre excited about a project, you get impatient and just want to get it finished as soon as possible but I am learning that its much better to let it evolve in an organic way, let ideas simmer and to just try different approaches. If it doesn’t work then I can usually fix it and just start over.
Materials used?
You know how in the movie Wall-e where he goes about his day but if he sees something he likes or that may be useful, he collects it – so he ends up with 20 zippos but doesn’t smoke? Yep, that’s me, minus the awesome rotating bin organisers. I have boxes and drawers full of bits and pieces that I can use to scratch build (or repair) things around the house or for projects or photoshoots, so the materials were “just stuff I had lying around” 😉
Some notable mentions would be:
computer parts – breaking down just one mainboard can give you enough capacitors and inductors for several projects;
juice bottles, disposable shot glasses – the thin plastic from these are easily cut and shaped.
old stationery supplies, craft items, jewellery – beads, broken thumb tacks, I cut up an old biro as well
old toys – an old gag gift made up some of the bigger pieces after I cut it up and rebuilt the parts how I wanted. The swivel ball joints and
pin hinges were perfect to articulate the rocket launchers.
xmas lights – rewired the lights with a bit of soldering for some of that wow factor
How much is recycled?
Almost 100% – apart from the original figure and the batteries
What are your ambitions as an artist/creative person?
Im definitely more creative than I am artistic, and most of that creative energy goes into my photography, but just like my photography, if I shoot too much of the same thing, after awhile I get a hankerin’ to try something different. Under my creative construction hat I’ve also rebirthed and repurposed furniture and other items but its more just another outlet to keep the juices flowing than any thing with a defined destination. Plus we all know artists don’t get paid any where near what they should… and Ive grown rather accustomed to my current lifestyle 😉
Can people order or get there own little munny’s in your style?
This was a one off piece – with over 70 hours of work, it was definitely a labour of love which I probably wont be taking on again any time soon, however if anyone has any special requests or ideas for an interesting piece they’d like to commission parts for then Id be more than happy to discuss it. Though, while this or any kind of replica is not in the works, I am in the process of getting a few limited run made-to-rder custom pieces together for sale (of a pocket sized weathered robotic variety – there will be the option of choosing a colour and the degree of weathering). Details will be posted through my “soulbridge media” photography page.
Love is…
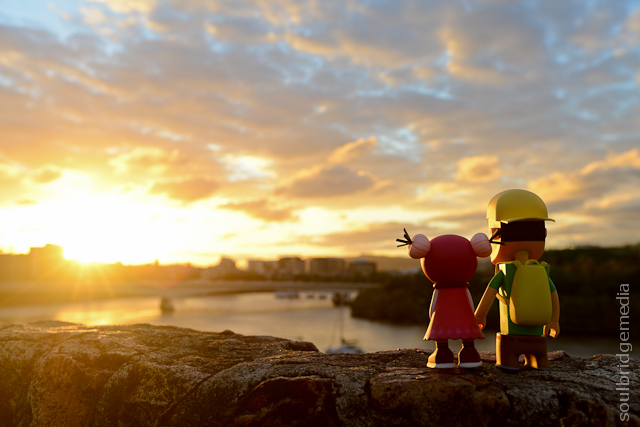
Titled: Love is but a moment shared.
We had a BBQ at one of Brisbane’s go-to spots and I just so happened to have a couple toys with me (and its rather uncanny as to how close they resemble me and my little lady 😉 )
Nikon Australia liked it so much they made it the cover photo across their social media outlets for the week of Valentine’s Day (:

Before and After
A quick piece I whipped up for a friend’s birthday gift. Figure is actually only 4.5cm tall so it was rather fidgety, need to get pointers of some Warhammer geeks 😉
Brush work with acrylic and enamel paints.


Kidrobot 10 year anniversary

Its no secret we’re quite the fans of Kidrobot over here at SBM HQ so its great to see they’ve cracked double figures in toy and fashion world, no easy feat!
They have alot happening in the way of celebrations but one interesting thing is a timeline of milestones and some back stories of artists and creations that have graced the ‘robot’s brand over the years, a worthy read for newcomers and old vets alike. Happy Birthday KR!
The 10 year story of Kidrobot here

So where was I the last couple weeks? Why, getting head spins from paint and glue fumes of course!
Some of you may know I also moonlight under the Saru Venom/James Saru monikers for my creative projects, in this case it was for the Laced Munny customising competition held in conjunction annually with the Kidrobot Dunny release. With top notch entries in previous years I really had my work cut out for me, not to mention one of the biggest hurdles of just getting it started (unlike previous years!). So I decided to go all out and create the Diodon Battle Droid based loosely on Robotech Mech Warriors and incorporating some freshly learned painting techniques thanks to a resurging love for model kit building. Also threw some LED’s at it for good measure 😉
The competition itself had really taken off this year with 39 entries from some talented artists but the hard work paid off as I took home 1st place in the competition! 😀
Special thanks to Laced and their sponsors for hosting another great event, now how to follow it up next year??
Check the spec sheet for build information and the detailed photos below.


Boreen Point 14/10/11
It had been a good 10 years or more since I last pitched a tent (oh grow up :p ) but the call of the wild and associated tech gear finally took its hold so an excursion to the scenic Lake Cootharaba town of Boreen Point was on the cards. Thundery storms were predicted for the whole weekend but as luck would have it, we only got a shower around 5am the second morning, though that was enough to ruin any chance of snapping some sunrise shots. Never the less, fun was had on the beach and lake and with a couple of my inanimate friends 😉


More photos here
Merry Christmas everyone!


Hope you’ve all been good or at least good at it 😉 Santa will no doubt be rockin the Gortex tonight, hopefully the pressies don’t get too damp!
Here’s a couple quick photos from us with a couple of our Xmas friends up to mischief!


Sylar versus Hasegawa

Sylar wastes no time in trying to find out what makes girls dress like tarts (not that there’s anything wrong with that 😉 )
Customising your own Kid Burner
Ok so you want to build an army of custom minions to do your bidding or perhaps the Rsvp’s to your tea parties look a little thin? Then its time to get your Martha Stewart on.
If you’re thinking “Ay? What’s this all about?” then you need to have a quick read of this. For those up to speed, continue reading.
These are the steps to create a simple decoupage’d custom
-
Step 1.
You’ll need a few supplies

Ask for help if you need to, just dont ask Ken. He has minimal articulation 😉
1.a) Hey doll! – Nooks knock off toy. These are available from Cardiology. As these are privately run franchises, stocks vary between stores. I have been getting mine from the Garden City store (Mt Gravatt, Brisbane) as the city store doesn’t stock them. Call ahead to save yourself a trip. They’re $10ea. If you’re planning on doing a few of them, ask for the loyalty card, buy 10 get one free. (unfortunately I only found out about it after I had already bought 10!)
b) Choosing your Nook. There’s quite a variety of different shapes and colours (you can get an idea from their site), so choose one to match your mental blueprints. Depending on the colour of paper, you may want to choose one that matches or best compliments the colour you’re working with. If you’re after predominately white or black characters, the mouse and the skeleton respectively are the way to go.
2. Get the – Paper. The sky is the limit for this. You can use anything from newspaper to wrapping paper to butcher’s paper. Have a look round the house or pop down to your craft/discount store. The only thing to remember, it has to be rather absorbent and not too thick so the glue can soak in, which makes it stick better and is a lot easier to work with ie. More pliable around edges and curves. Beware of papers that have a high gloss, super smooth finish or are woven, these can have
a plastic/cellophane content and are really tough to work with. If you’re not sure, you can test your paper by cutting off a small piece adding a drop of water, then seeing if it will mould and stay around the edge of the foot. If it doesn’t stick or hold its shape when you crease or fold it then you might have to choose different paper.
3. Stuck on you – Glue. The cheaper and thinner the better! You’ll need to soak the paper in glue so the thinner it is the more likely it will soak right through. This also gives a light lacquer finish on the final product. I used a simple glue pen. Great for controlled, no mess application and readily available. IGA has them for .92c
4. Ya – Tool. This will be used for applying/spreading glue and selecting, positioning and “working” pieces. I chose a couple good quality round toothpicks. Cheap and plentiful. The point is used to press the paper into creases and joins ie. Around the neck and arms and also to “magnet” pieces so you don’t need to put everything down each time you add a piece. The round edge will help you roll pieces flat, mould them to contours and edges and also to disperse excess glue. You’ll want something that will sit comfortably in your fingers, so find something that suits you, wooden skewers or disposable chopsticks are also options.
5. ob ja dart – Other bits and pieces. The rest are things you should have lying around the house and will just help make your customising a bit easier. Clear working area – little bits of paper + glue = mess in any language. Scissors – for cutting decou bits or for those corners that just don’t crease. Something small to “fence” or contain your decou clippings from exploding everywhere at the first sign of a cough or if you sit down too fast, I use a large roll of sticky tape. Damp cloth – for stray glue bits or if your fingers or tool get sticky. Drying rack – something to sit the little guy on with minimal contact while its drying, I used an up turned flat backed power adapter.
- Step 2
Prepping the toy. If you’re using lighter coloured paper you may need to go over the painted areas of the original toy so they don’t show through. You can give it a quick light coat of ACRYLIC paint in a similar colour or if it’s a predominantly white one, at a pinch you can use “white out” tape.
-
Step 3
Paper prepping. Tear or cut your paper into random shapes and sizes roughly 1-2cm (Note: larger pieces can be harder to work around contours and edges). Torn paper = greater absorption and bonding to other pieces. Works better for random patterns. Cut paper = better for joining/matching up repetitive patterns. To minimise overlaps, joining edges need to be straight. As the space is filled you’ll have to start tailoring the pieces to fit exact spots.
-
Step 4
Decou-ing. I start from the top down. Apply a liberal blob of glue round the top, front and back of the head. Make sure its nice and thick, not too the point its dribbling but enough to wet and soften the paper. Any excess can be wiped or “squeegeed” later. Don’t worry about the glue drying on one side while youre working on another, it takes quite some time to dry by itself (~15-30min). Start with the larger pieces to cover more of the easy areas first. Place a piece on the gluey area then lightly dab it round the edges with your toolpick. When it starts sticking, roll from the center out, just like if you were rolling out a pizza base with a rolling pin. This kneads the paper and helps it absorb the glue and also squeegees the excess glue out. If some parts pop up or don’t make flush contact, add a couple dabs of glue on top of the paper, this will soften the paper
and make it more pliable. Some of the acute angles like on the feet or hands, you may need to soak the piece in glue and let it sit or even add a drop of water to the piece before sticking it to the body.
Stick torn pieces with a little overlap and cut pieces edge on edge to help make a smoother finish. Too much overlap it may end up lumpy, too little and youll have thin/clear spots that you will have to go over with pin head sized pieces.
Once you finish the head and body, you’ll find less dry spaces to hold, so it’s a good idea to do it in parts, allowing the sections to dry in between. I used an upturned power adapter as a cradle to sit its head in so there would be minimal contact and less chance of it falling over while drying. Those of you in countries that only have 2 prong adapters may need to find an alternative. Once dried, go over the completed areas and make sure there are no air bubbles or stray/rough edges. Some can be pressed down with your finger nail while others may need going over again with an extra dollop of glue.
For finer details around the around the neck and arms, you can choose to lock it in a London guard position by decou-ing over the joints or if you want movement you can use a scalpel afterwards.
Take extra care to roll the feet flat, the dolls are nose heavy and topple easily. When its almost dry, find a flat surface and press down hard to make sure they can stand their ground.
-
Step 5
Finishing. Once you’ve finished gluing, give it overnight to dry then check for any gaps or thinner areas in the paper. Touch up accordingly, allow to dry then add your final touches, paint, pen or glue on other features or accessories and you’re done!
Here’s one that i whipped up using the dragon analogue

Been busy? Hit us up in the comments with your own custom vinyls!
Toys toys toys!

With the call of Xmas and all the consumerism, especially of the moulded plastic kind, that it has to offer, we thought we’d give tribute to the little things that some how make us smile no matter what (:
Here are some of ours Gallery here
