
Removing and Painting VW badges
This is a bit of a change to my normal posts but hopefully it’ll be just as informative (or at least interesting!)
The net is full of instructions to remove and paint (or vinyl) your VW badges but I found a couple key points were brushed over every time, namely the removal of the front badge where instructions were simply “just turn it a bit” or “turn it about x amount”. It seemed there was quite a polarisation between people that could “just” pop it off and those that had all kinds of trouble to the point of having to remove their grille first, most falling into the latter in the hope to spare doing damage to the badge or grille.
So just like a onesie party or writing a novel about a futuristic amusement park where dinosaurs are brought to life through advanced cloning techniques and calling it “Billy and the Cloneasaurus”, he’s my version of events…
This is specifically for a current model MK6 VW Jetta but I believe it will also apply to Golfs and several previous generations.
Removing the front badge
The badge is attached to a deep mounting bracket which is held on by 3 clips in a triangle shape. The one at the top can be access from behind near the bonnet latch with a long thin flat head screwdriver.
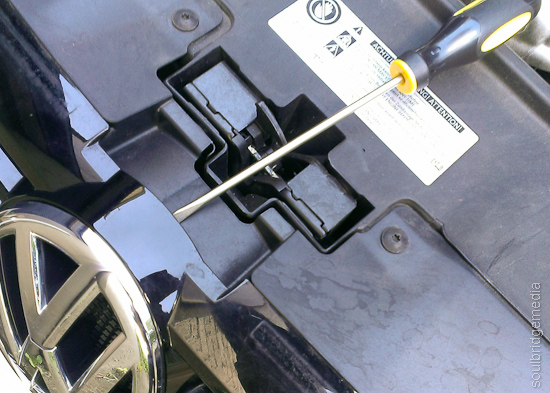
Come in from behind… errr..
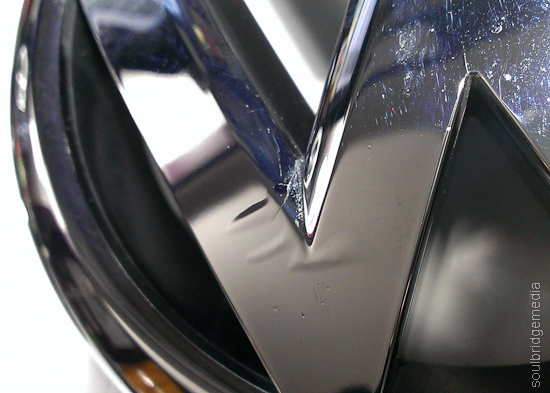
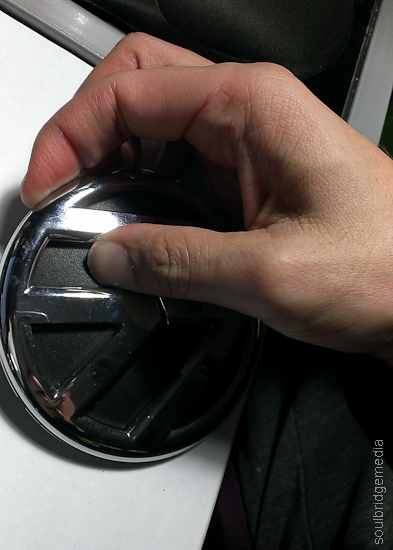
First “just” try turning it to the left, you never know, you could be one of the lucky ones, if you are, you only need to turn it till the right side of the V on the badge is vertical. It is quite likely that you will over shoot the mark if you put a bit of force behind it so just dial it back to that position then pull the badge forward and off.
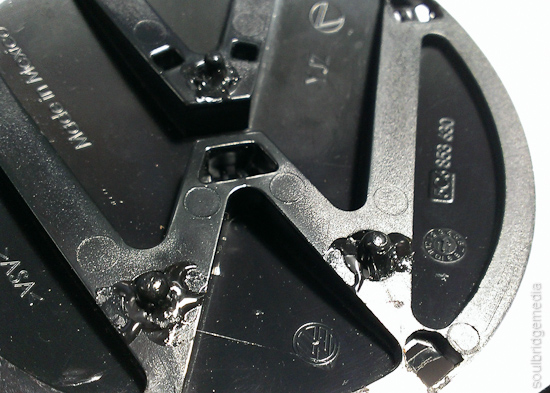
If you’ve put two hands on it and given it a “carn you bas-tard!” heave-ho and it hasn’t budged, itll need the extra persuasion. First check the emblem itself to see if there’s any damage or imperfections on it. If there is, you might want to go a bit gentle on it. As seen in the photos, my badge has a slight bubbling in the chrome and a small crack, both acerbated after a few big cranks to get it free.
Next, lightly (or not so lightly) jiggle the housing left and right and back and forth. Grab that screwdriver and press the tabs towards the center while continuing to turn and twist. There might be a couple creaks of protest but after a little bit you will notice the housing will feel slightly looser in places.
Take the screwdriver and line it up with the right hand side of the top tab and push while turning the housing with your other hand. You may need a bit of force so watch you don’t skin your knuckles or puncture part of the car or yourself with a wayward screwdriver.
As above, you may over shoot the “open” notch, if so, just dial it back and pull it out.
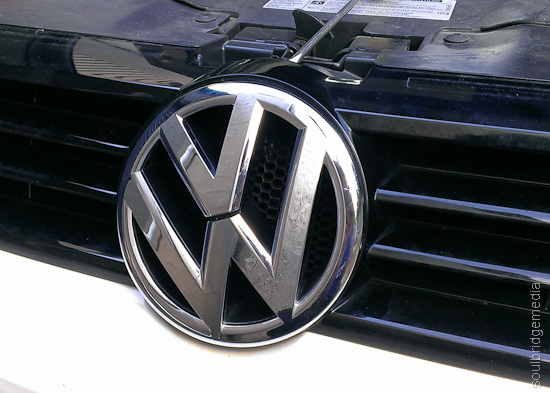
Right side of the V is in the 12 oclock position

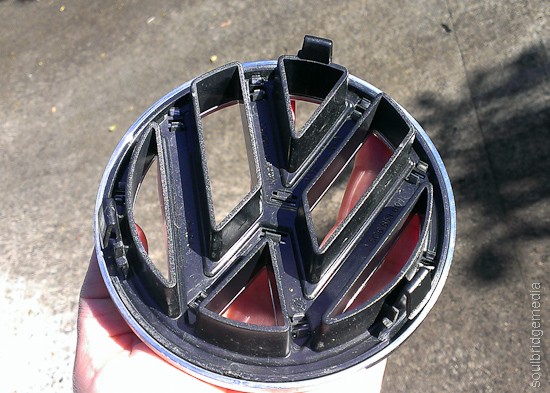
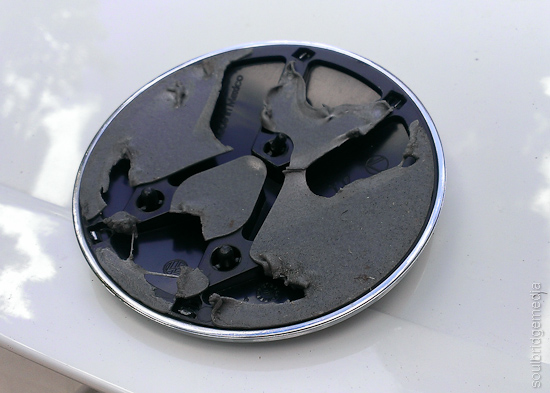
The housing, note the 3 slots for the clips
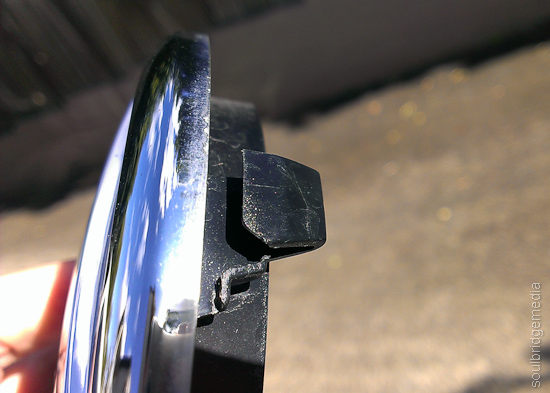
The bane of your existence, note the notch which locks it into place.
Prep and Painting
(I didnt bother taking any photos of the badges sitting on the bench covered in paint, there’s plenty of those online)
Like painting anything, if your base surface isn’t prepped right then you’re not going to have a good time. Any blemishes have to be smoothed out otherwise they’ll be just as visible after painting. I used 400 grit to smooth down the bumps, crack and a couple little dibbits then scuffed up the whole thing (housing and emblem) with 800 grit. I’m painting it black so I didn’t bother removing the emblem from the housing (see rear badge removal for tips below on separating the emblem).
Warts n all
Hit it with a primer, then your chosen colour. Remember with painting anything, don’t get impatient, follow the instructions on the can and give it plenty of time to dry. Sand the first coat as well if you have to.
(Also don’t use old paint (I’m talking close to 10 years), it’ll give a nice marbling effect which you’ll have to sand back and redo… just saying :-\ )
Throw on a couple coats of clear for extra protection, especially since its going to be on the front of the car. If you want a matte finish, use a matte clear. If you don’t have matte you could use a gloss with a 2000 grit sanding over the top to take the sheen off but only if you have a black belt in sanding.
Refitting the badge is as simple as a flick of the wrist and it should just click into place. You may notice the locking notches are a little rounded after removal, this makes it heaps easier to remove for future changes of mind but also for grubby little mitts so a dab of hot glue or some strategically placed two sided tape.

Front – After
Removing the rear badge
This, by the general consensus is a million times easier, and it was. The recommended old credit card seems to do the trick no problems too. The double sided tape holding it on is rubbery and sticky so you could probably even fashion a jagged “blade” from a juice bottle to give more cutting power, otherwise the card will work fine.
Find a spot around the edge that isn’t sitting as flush, you may need to get your fingernails under it to kick it off. If no where really works, try dead center up the top, there’s a small notch in the housing on the underside that might be just enough for the card to slide in. You could also try some dental floss if you get really stuck.
Work your way around to the soft spots, gently lifting the badge as you go. Take care not to scuff your paint or bend the badge up too far, let the card do the work of separating the badge from the car.

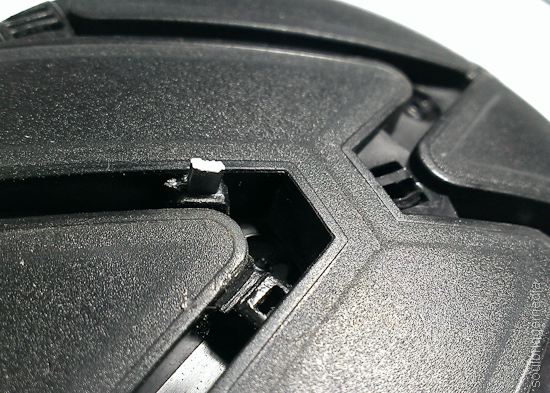
When you’re about half way you’ll notice there’s 3 little stems sticking out, these are used to align the badge for mounting. The problem is they’re built on to a very weak frame so in the course of removing, painting and refitting you will no doubt, bend or break at least one of them off. Not the end of the world but do your best to preserve these, it’ll be a godsend when it comes to refitting.
Super sticky goo
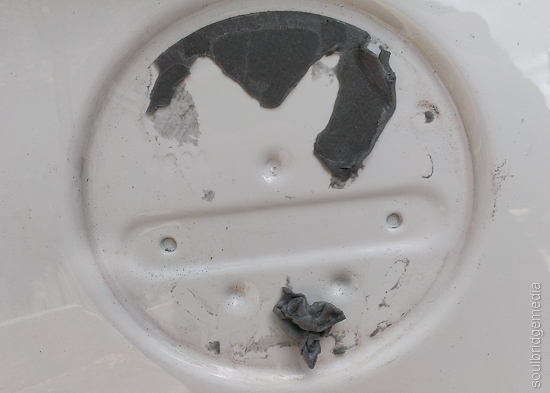
3 dibbits for mounting
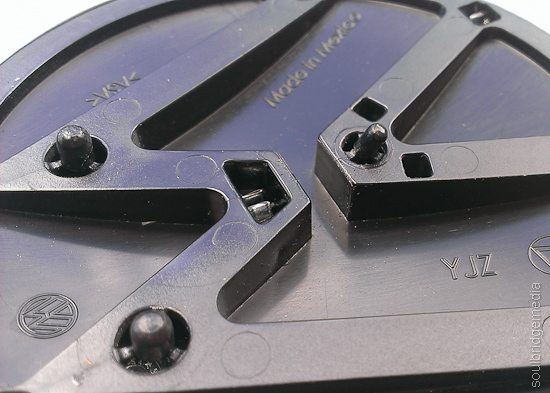
Bom-bom. Look how thin those supports are!
I gave them a bit of strength straight away with a couple dabs of glue.
Looks messy but the glue I used shrinks as it dries
Separating the emblem from the housing
Most sites suggest using a screwdriver or other tool to push the tabs through from the back, I found this is pretty much impossible to do without damaging the tabs or slots in some way. The chrome plating is strong but brittle so it tends to crumble or dent with only the smallest amount of pressure so I figured the best way is to not touch them at all, instead just pushing it out with my fingers.
Put your thumb on the front of the housing (black part) and your fingers on the very edge of the underside of the emblem (chrome part). Push with your thumb and pull/peel with your fingers, kind of like opening a can of tuna or baked beans with a pull tab. Work your way around the outside, these are the easier ones. For the center ones you may need to change your grip using more of a 3 finger pinching motion, pulling with your finger tips and pushing with your nails on the same fingers. Pulling from the outside while the center is still attached may bend or crack the emblem where the letters meet the circle so be careful. A bit of wiggling and changing of angles should pop it off eventually.
Use two hands and go slow…
One problem I came across is one of the tabs was glued/melted to the housing, possibly for extra security to stop it from falling off. Thanks to the brittleness and thinness of the tab, you can keep going with the “pincher” and it will eventually snap, if you don’t think its going to give, leave it to last so there’s enough room to get a blade in to cut it. Cut the broken tab off to save it from getting in the way when you’re refitting.
Which one is the anchor on yours? Its a gamble!
Removing emblem from the front housing would be very similar. Even though I didn’t try it, I think you should be able to use a similar method to removing it from the front badge, prying from the front instead of pushing from the back. The problem here is there’s nothing to push on from the front so you might have to try a couple spots around the edge first with the ol credit card, then once you have a big enough gap use something like a disposable chopstick to get in between the two layers and pop the tabs out.
Prep and painting is the same as describe above, but if you are matching the housing to the colour of your car take note that there is some texturing to it so you’ll need some extra sanding and a few extra coats of paint to give it a smooth panel finish. I found the paint still wasn’t very glossy after this (fine in the grooves where the emblem sat tho!) so I topped it off with some clear gloss to better match the car’s body.
Fitting rear badge
Standard double sided tape (the foam stuff might be a bit too thick and may make it easier for thieving hands) from an automotive store should do the trick ($5 for a small roll from Autobarn). Take a hobby knife to the edges to give it a good fit. Before peeling off the tape, give the area a good wipe down to make sure it is free from dirt and old tape. Also check to make sure the areas you have taped are making contact with the body, you may need to stack the tape to give it more height. If you kept the mounting stems itll be a simple matter of lining them up and pressing firmly.
Back – Before
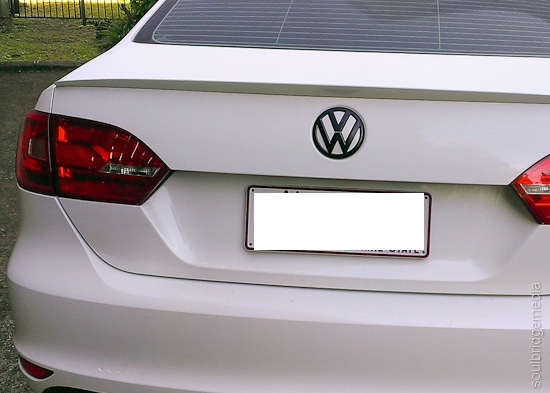
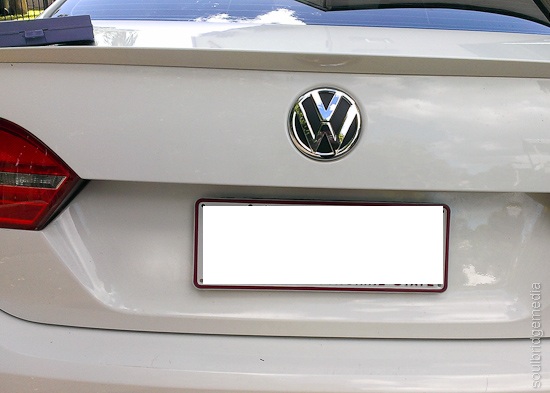
Back – After

Side note: I lazily looked up my paint code online instead of in the manual and found VW’s “candy white” colour code LB9A. Giving this code to the paint man he could only find this colour going up to 2004 but nothing under the model search for a current gen white (weird, I know) so I figured it was the right one. It wasn’t till I got back to the car and threw the stuff I bought into the passenger side that I noticed it was printed on a label on the door sill (derrp) but this was listed as B4B4. I did a quick search but couldn’t find anything about the difference but found plenty of places selling the one “candy white” with both codes. After painting the backing I walked around the car with it and couldn’t really tell the difference on most parts of the car (in fading sunlight). If anything, the small discrepancies would be of a slight fade on the original paint. After fitting it seems to have blended pretty well so I would have to say the codes, to my eye, are interchangeable but please correct me if I’m wrong!
Hope this post helps to clear things up for some people and give a bit of confidence to those who weren’t sure before hand. Happy DIY customising!
ps. I’ll get some proper photos when its clean… and I find some time!
Beijing 2011 part #4 – Shopping
Shopping in Beijing… where to start? No, seriously, where do you start?? There are scores of huge multi-level shopping centres which pretty much fall into two categories, high end dedicated brand name stores and haggle city, home of knock offs, repetition and de ja vue. Having shopped till we almost dropped (well at least to the point where we were shipping box loads of stuff home from San Fran and London), our enthusiasm to battle the crowds was waning but we still managed a few stops and a couple last minute items to toy with out luggage limit.

Wang Fu Jing Da Jie
Downtown
A good place to start is downtown Beijing (Dongcheng), an open air, sealed off road style shopping/business center on Wang Fu Jing Da Jie (crossroad : Jinyu Hutong). Nearest metro is Dengshikou, under 1km away or a similar distance from the Forbidden City (depending on which exit you take). Hesitant or cultural shocked shoppers will find this a nice way to ease into it, nothing like the Golden Arches or the Colonel to set your mind at ease no matter where you are in the world 😉 The northern end houses a fair selection of branded watch stores included Omega, Tagheuer , Rolex, our G Shock friends and plenty of glasses/optometrist stores. Nike Beijing is also there, mostly along the athletic side of things with only the latest stock so you wont find any rare releases or streetwear related items but there is a Nike iD upstairs. The store sits in a multi level mall with a run of the usual random clothing and electronics stores, there are however some notable boutique stores sporting some designer Kidrobot, anime, kawaii style gear, like Devil Nut, unfortunately they had the prices to match. There’s also a smallish Adidas store, good for a couple regional tees.

Nike Beijing

Nike iD


Devil Nut
On the southern end of Wang Fu Jing you’ll find another shopping mall – Haoyou World and a bunch of eating places, most notably the famous Wang Fu Jing snack street, great for a plethora of variety but you will have to haggle for your dinner if you want it at a reasonable price or you could take the easy route and go with Yoshinoya.
There are also a small scattering of boutique street wear stores in the surrounding blocks like this Eternal store stocking Nike SB and other skate related brands and products but as with many of these shops, they come and go so be sure to do your research before hand and potentially save yourself a hike.

Eternal

…where you can buy members of the Wu-Tang clan…
Hongqiao Market (Pearl Market)
If you’re out visiting the Temple of Heaven then this “market” is only a couple hundred meters north of the East Gate exit (just up from Tiantandongmen metro stop). The Pearl Market used to be THE place for knock off goods but after getting hammered by the license holders and having building management crack down… its still pretty much the place for knock off goods!
Even though the name suggests its only pearls and jewellery, these are mostly secluded to the top 2 floors, but a bargain (on the real deal) can still be had if you know what you’re looking at/for.
The lower three floors are made up of side by side market stall set up. Most with glass display counters so its more like a department store than a flea market.
Level 1 – Mostly electronics – cameras, mp3 players, storage media, watches, audio/visual. Beats Audio headphones for $40AU? No thanks, even with the pleas from the sales person as “real deal, good buy”. While there were quite a few stores selling DSLR equipment I was still skeptical to the quality as there was just no way of telling if they were warranty repairs or QC failed grade. There were also some silk items and underwear stores mixed randomly between the other stores.
Level 2 – Clothing, shoes, handbags, travel goods – this is where things get tough. Once upon a time I think alot of broke kids much like myself would’ve just been happy to have the brand logo, if it had the same cut/style/distinct features that was a bonus, but I guess as you get older (and have more disposable income) you get choosier and you also buy products for their technology/features/build quality. So the dilemma quickly becomes apparent, that North Face jacket says it has Goretex, looks and feels like it, even has the tags but do I really want to find out in the middle of a downpour far from cover that it isnt waterproof? The sneakers however were a lot easier thanks to my trained eye and a bit of common sense. Jordan 1’s in unreleased colourways or limited edition from 5 years prior just sitting on a shelf at a market? You’re definitely right to be skeptical. Where things get difficult is with current run of the mill models. Being in the country that makes the genuine article means there are plenty of variants, which can even be authentic stock that followed a factory worker home or the more common “fell off the back of the truck” items. Where the seams start to come apart (pun!) are those that have the same equipment but cut corners with materials and quality control. So keep your wits about you, if its too good to be true then it usually is.
Level 3 – Traditional Chinese art, ornaments, vases etc. – Worthy stop for some souvenirs, just remember two things – 1. take note of the materials used in the items, remember AU customs isn’t going to look too kindly on that living bonsai pondscape complete with exotic goldfish (and if you do find something you think will be passable eg. Wooden vase, save yourself embarrassment and a possible fine, declare it) and 2. haggle haggle haggle.
Finally outside there’s good ol’ reliable Yoshinoya and to the right and behind is the Hong Qiao toy market, which I only found out about recently, how I missed this in my research I have no idea! Can someone go check it out or those that have been, tell me its crap so I don’t feel so bad? 😉
Photo tip – like alot of places that sell “unofficial” (re: fake) goods, the shop owners can be rather “private” (re: paranoid that you’re collecting evidence). I managed to get a short video (on a point n shoot) walking down one of the aisles before I was repeatedly beaten… with a rolled up brouchure. Admittedly moo-ing like a cow then asking about “copy watch” didn’t help my case so it’s best to keep photos to a minimum or feel the same wrath.
Hutongs
One of the other bonuses of staying at the Courtyard 7 was being pretty much in the middle of a lane of boutique stores and restaurants on S Luogu Alley, which you could easily liken to places like Bulimba or West End in Brisbane. Many stores stocked a random assortment of quality knick knacks, unusual souvenirs and designer kitch, a far cry from the generic over rehashing of comparative market stalls.

S Luogu Alley

Plastered 8


Vintage wind up toys
Places like Plastered 8 stocked designer tee’s, most with an Asian theme while “Vintage wind up toys” was exactly that, old metal wind up toys. Most were replicas but there were also some older antique items amongst general toys and oddball items. Hipsters will go nuts with Lomo camera gear offerings and of course you can’t leave China without some kind of panda paraphernalia.


Love Cupcakes
Tea houses, small bars and even gourmet cupcake stores follow the lane up to Gulou E St which becomes Jiaodaokou E St. (a major arterial road which leads to the nearest metro stop, Beixinqiao). Along here you’ll find the regular western fast food places with a few clothing and toy boutique stores, many with no names like this toy store, which was packed to the ceiling with figures and model kits while another sold giant plush poos. Good luck or not one managed to follow us home 😉 and with that, comes the conclusion of our 2011 round the world stint. A little slow in the recap but we got there in the end!

Coming soon, we’ll be reliving this year’s getaway from the land of Jurassic Park, 50 First Dates, pineapples, coconuts and shave ice (no “d” 😉 )… HAWAII!

Beijing 2011 part #1 – Arrival + Temple of Heaven, Forbidden City
Beijing 2011 part #2 – The Great Wall – Mutianyu
Beijing 2011 part #3 – Beijing Zoo
Beijing photo gallery here
Beijing Zoo photo gallery here

Getting There
The closest train station was over a kilometre away but we decided to walk from our hotel to take in some of the residential sites as well as making a short detour pass the Drum Tower, however after that there wasn’t much to see. Catching the train was a breeze – get on at Gulou Dajie, change at Xizhimen and get off at Beijing Zoo. A taxi would have been more convenient but judging from some of the traffic we saw along the way, I dare say the train would be quicker (depending on where you’re coming from of course).

Drum Tower
Once there you’ll have to purchase your tickets, don’t go into the courtyard and expect to get tickets at the gate, look for a line of ticket windows with a mass of people looking like a cross between the stock market and the lines at a music festival. This isn’t London, no
one knows what queuing is, throw in wandering tour groups and masses of school excursioning kids and you’ll understand why I recommend
pre-purchasing your tickets if you can. Like most major attractions there’s rarely a quiet time but a week day visit may see a few less locals.
When inside there’s three areas roughly divided into amphibians, reptiles and birds; big animals and aquarium; and lions, tigers and bears (oh my!). Of course the star attractions are the pandas and the area, especially at the start of the day, was packed so we decided to head away from the crowds.


Things kicked off with the reptile enclosures but the first flag appeared when we saw a group of locals coaxing otters by feeding
them sausages and other snacks while staff stood by unconcerned. I don’t know about you but I have no idea what otters eat let alone what could potentially kill them! I for one definitely wouldn’t want no otter homicide on my hands.

Normally we love zoos especially the big ones where the animals have plenty of space to roam but as we continued it became more and more obvious and rather disheartening to see a lot of the enclosures in varying states of disrepair not helped by the original poor attempts at “authenticity” re: jungle mural painted brick wall.

Sporting a similar poorly simulated scenery was the penguin enclosure, which like several displays wasn’t included in the ticket price. A separate ticket had to be purchased for this enclosure and quite frankly it wasn’t worth it, even with our overwhelming love for the little tuxedo wearers.

Like the penguins, it was an extra fee to get up close to the giraffes but this time you could actually feed them by hand (leaves and other greenery, not the stuff from your bag).

The hippo, rhino, elephants, lions and tigers were all either off in the distance or not visible at all so it was a quick breeze through those sections. Back to the pandas, the crowd had waned a little but it was still at least 3-4 people deep in parts and quite a battle to get close to the viewing glass to snap a photo, but well worth it when you do.
Photo tip: battling the crowd is the easy part, getting your camera close enough to no get any reflection from the glass or 10 camera phones in your shot while dodging some parent holding their terrified scream protesting kid in between the rail and the glass is the real challenge. Just like waiting at a bar to be next in line for drinks you need to choose your moment and make a quick move to any opening spots. Keeping an eye on the movement of other background animals could help you lock in a good shot as well. Wide to mid range zoom with macro ability will be the best lens choice for the whole day, I found a long telephotos lens wasn’t necessary.
With that bit of disappointment done and the rest of the Beijing sights seen, there was only one thing left to do… SHOP!
More Beijing Zoo photos here.


Beijing 2011 part #1 – Arrival + Temple of Heaven, Forbidden City
Beijing 2011 part #2 – The Great Wall – Mutianyu
Beijing 2011 part #4 – Shopping
Beijing photo gallery here
Beijing Zoo photo gallery here

We’re not talking about the el cheapo 4WD and utes but the real mccoy, the one you can see from space! Its as vast as there are sections of it to see and options on how to get there.
Getting There
The first and quite common option is to arrange a tour. Like any tour, it’s a matter of fronting up the cash then waiting for your transport and instructions, easy enough. However the problem with this is a lot of the tour companies/bus operators/tour guides are in cahoots with local factories/markets so they make a few stops along the way so you spend money there as well. This might sound like a good idea but pick the wrong one and you’ll spend hours at a stop with nothing to do but get hassled by hawkers. Also not very good if you have a schedule to keep. There are of course legit operators and “private” guides that will take you directly to the wall, so do your research first!
Second option is to charter a taxi for the day, ie. You pay them to drive you there, wait and then drive you home. This option, while a bit expensive, would work well for a direct and quicker (no stops) travel but can be cheaper if you have a few people together to split the fare, the trade off however is trying to get a guarantee that the driver will hang around and wait for you and not run off as soon as some one else waves cash at them. On the plus side, there are plenty of drivers at the wall willing to take you back to the city so you wont be stranded.
Third, if you like living on the edge, is to hire a car. Cost is similar to most countries of $50-100AU a day for an “economy” size from a reputable dealer, however, assuming you have been in town for more than a minute and have witnessed the chaotic homicidal (or should that be suicidal??) drivers, this would be a last resort for most.
The final option and by far the cheapest, is to take public transport. I’m not sure about other sections of the wall but Mutianyu had only 2 bus services, slow and not as slow. Both will get you there eventually but one will make a lot more stops and a slight detour. The bus you’re after is the 936. To find this bus station, head east along the main road from Dongzhimen station for a few hundred meters. You’ll see the buildings die off, construction sites appear and it looks like you’ve gone too far (though, in the time since we travelled here its best to assume that there’s a new shopping mall/skyscraper there!), you’ll come across an open air bus terminal (see image). There’s a small ticket office (re: demountable building) but tickets are purchased on the actual bus. The journey is over 2 hours and there is a strong chance you may not get a seat and will have to sit on the floor. Also note, some seats have a different coloured headrest, after a lot of dirty looks and what we originally thought were comments about foreigners from elderly people we worked out that the seats were reserved for them. Strange since they were in the middle of the bus and not at the front, didn’t help that these weren’t signed/labelled!
Remember these are the options I looked at for the Mutianyu site, other sections like the popular and closer Badaling section will vary.

Bus stop
UPDATE: It seems they may have ditched the “express” 936 service and replaced it with the 867, however the stop seems to be the same. There is also mention of a 916, see Lonely Planet for more details.
Up the wall
Once at the wall, there are a bunch of different options to choose from depending on your available time, patience and stamina. The bus stop (cabs and carparks) are at the bottom of the mountain away from the wall. The ticket office and entry in itself is a bit of a steep walk to get to, made no easier with having to run the gauntlet of hecklers selling just about anything with the obligatory Wall reference.
Travel tip: Remember to bargain hard and never feel like you’re low balling them. Supply always far outweighs the demand.
From the entrance you have a choice of a hike up the mountain to the wall or a cable car. We figured since we were already going to be doing a bunch of walking we’d choose the relaxing trip on the cable car. If you are trekking to the untouched re: “wild” sections of this wall section then this is the way to go, it drops you at tower 14 and with 34 towers for this section itll save you some energy as well! We chose to head in the other direction back to tower 5.

Cable cars
The wall was constructed purely as a strategic military point of defence and offence (remnants of cannons still remain) and it becomes very clear once you’re on it how difficult it would be for any invading army to even begin to think of how to get across the mountains and foothills let alone the wall as well. So with that in mind, there’s no “easy parts”, its constantly up and down with uneven paving and stairs. This is where good quality hiking shoes are a must. Thongs (flip flops), sandals, “girlie” shoes or cheap/poor support/cushioning sneakers will leave you with more than just blisters or a rolled ankle before you pass your first tower. Water is a must as well but there are vendors along the way selling drinks, ice creams and even beer, just remember to use the bins provided or take your rubbish with you even if it is overly tempting to follow suit with the locals and hoik it over the wall.

The wall quite literally goes on forever, its hard to fathom the sheer man power and materials required to be such an epic structure which you feel with every step. Step long enough and you’ll make it to tower 6 and salvation! Well maybe not but its your ticket out of there, not just in style but with speed (for the most part anyway) as this is the top of the toboggan ride!
This is similar to a lot of toboggan rides around the world, small single person sled with a manual stop/go lever down a metal chute. This was great fun but would have been even better if we could get more than a couple corners at a quicker pace. Sadly like a lot of these rides, there’s the token “Henny Penny” that will scream and clutch at the ground with their fingernails if they could, even if they’re travelling at a snails pace. The signs warning NOT to brake as it will cause accidents were useless and at least half the ride was more like returning traffic on the last day of a long weekend. For those thinking that you could some how get hurt if you go down at full speed, there are signs telling you when to brake and judging from the way the track is laid out, you would be hard pressed to hurt yourself, even if you were being stupid. Either way it made the return journey quick and reasonably effortless.

Toboggan ride
By now you’ve probably worked up an appetite and if you’ve timed it right, you’ll have just enough time to grab a bite before the return bus arrives. Food choice is limited to a small selected on local cuisine or Subway. Like a lot of western fast food places, Subway staff spoke a little English but mainly in the form of menu items, any deviation from this required the usual gesturing and improv’ charades.
The line for the bus grows quickly so its best to line up as soon as you can to get a seat, if not you will have to stand or sit on the floor, which is rather uncomfortable for the quite lengthy ride.
Next up we continue the China must see’s and track ourselves down some Pandas!


Beijing 2011 part #1 – Arrival + Temple of Heaven, Forbidden City
Beijing 2011 part #3 – Beijing Zoo
Beijing 2011 part #4 – Shopping
Beijing photo gallery here
Beijing Zoo photo gallery here

Temple of Heaven
What goes up, must come down, literally and figuratively. By now, we’d lost count of the number of flights we had caught and that first day in LA seemed like a lifetime ago. The concept of time and day had disappeared and jetlag had consumed us. I felt more like I should’ve be starting a Fightclub than hitting another country but sure enough we awoke after a restless flight in Beijing and zombied our way to the Airport express train.
Once you adjusted to the extra 10C degrees and double the humidity of Paris, the transfer is pretty straight forward to Dongzhimen station in downtown Beijing, Dong Cheng. I couldn’t believe our luck when we stumbled out of the station right into a waiting cab. But it wasn’t until we were at our hotel (after an unnecessarily long walk) that I had blindly handed over approx. $20-25AU to the cabbie instead of what should have been $5-10AU!
Travel tip: always be on your guard and suspect anyone and everyone are out to rip you off. Ok, its not that bad but keep your wits about you. (Honest) cabs are dirt cheap with a flagfall of only a few bucks for the first couple K’s then less than $1AU per km after that. All legit cabs have official markings and a sticker on the rear side window stating prices. If they try to pull a swift one on you just point to the sticker or ask for a receipt, if they try to haggle or give you excuses, just wave them off and move on. If they continue to hassle you, feel free to call them a “Zei” = thief and keep walking, they’ll get the point. This goes likewise for just about any store or market where haggling is used, if you don’t, you will be hit with the naïve tourist tax.
Temple of Heaven
The Temple of Heaven is more than just the temple (Hall of Prayer), its nearly 3 square km’s of parkland and a good 15min walk from the street, even longer if you’re caught out after dark as there are very few lights and the spaghetti of paths are poorly lit. The plus side to visiting at dusk is seeing a number of kite flyers along the Imperial Walkway. Kites are lit with flashing lights and as more slack on the string is given, the operator adds flashing lights along the string. Definitely quite the spectacle with the typically older male “pilots” loving all the attention from on lookers.

Temple of Heaven grounds at night

Kite pilot

Sword training
There are also scores of classes at work for exercise, martial arts, tai chi, religious and even swing and latin dancing, all very interesting to watch.
For general viewing however as mentioned its very dimly lit for the most part and the temple area closes around 5pm, once night falls there’s very little to see so its best to go during the day.
Travel tip: check opening times as they vary through out the year. A fee is payable on entry to the park, you can also buy tickets to the temple and other buildings or buy them at the entrance to the respective areas.

Temple of Heaven
Forbidden City and Tiananmen Square
Travel tip: If you’re coming from the Temple of Heaven on metro line 5, you can either take the interchange at Chongwenmen to the southern end of Tiananmen Square or if you’ve seen a square before and want to avoid the every present protestors, change at Dongdan and get off at either Tiananmen East or West stops which drop you between the Square and the southern entrance to the Forbidden City.

Tiananmen Square

Forbidden City - Tiananmen Square entrance

Forbidden City - Tiananmen Square entrance
Walking up to street level you begin to get a feel of just how colossal everything is. Looking back towards the Square and up at (what you may think is) the gates and battlements of the Forbidden city, people are dwarfed to the size of ants with the sheer numbers of visitors compounding the effect. Even the stairs up to the streets look like they were taken from your city’s favourite sporting venue.
Thanks to the ever present “threat” from protestors there is a strong military and police presence which can be a little intimidating to say the least. Walking through the gates leads to a huge courtyard area full of hawkers, beggars, people trying to sell you tours and souvenirs and general shifty types. If your water rations are running low you will be able to top up here but just be prepare to haggle for that too.

Forbidden City southern entrance
After close to half an hour of walking you will get to the actual gates to the Forbidden City and when they called it a city they’re not kidding! 999 buildings await you inside, so a fair portion of your day will be taken up exploring it. If that’s not your thing or you want to escape the barrage of people, exit out of the courtyard area either west or east and follow the moat around the surrounding wall either north or south to one of the corner towers for a great photo opportunity.
Photo tip: in the afternoon, photograph from the western side so they sun lights the wall and tower. On the off chance the smog isn’t so bad and there is some colouring in the sky, you may be lucky enough to get some colouring in the sky and get a nice silhouette shot from the eastern side.
With a little time to spare (and after having already walked to the northern gate) we decided to continue walking the back streets to our hotel. If you really want to get an idea of the city, this is the best way to see it. Basically Beijing is growing so fast that the new buildings and construction are popping up all around the once slum-ish areas without enough time for the original inhabitants to leave so you will notice after 3-4 blocks from common business/shopping/tourist areas the quality of buildings and living conditions dramatically decreases to the point of families bathing in the streets and selling fresh produce from the ground you’re walking on. Definitely a real eye opener.
After a couple miss turns and dead ends we were back to the familiar Hutongs around Luogu Alley and grateful for the bed we had to sleep on.
Next up, we take on the Great Wall!

Forbidden City - outer wall (click for big)
Beijing 2011 part #2 – The Great Wall – Mutianyu
Beijing 2011 part #3 – Beijing Zoo
Beijing 2011 part #4 – Shopping
Beijing photo gallery here
Beijing Zoo photo gallery here
Paris 2011 part #3 – Shopping
")
Nike - Paris
Ah Paris, one of the well known fashion and shopping capitals of the world… if you’re the type to frequent Rodeo Drive and the like, otherwise you have to venture further out to find outlet malls like La Vallée Village.
We only had one day of shopping so we decided to keep it central and stick to the “must-see’s” which meant we gave the hoity-toity malls a miss and looked for boutique sneaker and toy stores instead 😉
Les Halles metro station was the closest stop to most of these shops and conveniently part of the Forum des Halles shopping center which has a sunken open air section and the rest completely underground. Stores vary from high end brands to small boutiques. The few selling sneakers were more along the dressier side of things, coupled with the ever wallet punishing Euro, they were even less appealing. There’s a McDonald’s which is always a welcome sign… for free WiFi 😀
Entering the mall was fine via the metro station but exiting? Well that wasn’t quite so easy. It wasn’t till we were outside that we realised the whole thing was underground and from what we could see there was only one set of escalators out (that’s if we weren’t having another travel brain fart, which was highly likely with fatigue and jetlag clawing at our heels).

Fountain monument... thing
Up on the surface, there’s a small nature area with a fountain structure, no doubt with some historical significance like many random relics around the city… oh look Footlocker! It definitely doesn’t have the same presence here as it does in London but this store was quite large with a dedicated boutique styled store attached, specialising in basketball related apparel and sneakers – which wouldn’t look out of place in LA or NYC. The punishing Euro once again left us breezing passed a lot of items but coming across some unique pieces like a Yankees bomber jacket in hot pink with multiple team patches or a Yankees New Era cap in an illusive army green and orange colourway were too hard to resist 😉
Couple doors down there’s Skechers and Dr. Martins, if you didn’t get enough of them in London.

Unknown sneaker store

Opium
A short walk down some narrow cobbled Carnaby styled streets sees a handful of small sportswear and street wear styled shops, many sport Diesel logos on the front, whether or not they’re all authentic is another thing. A few notable spots, Zoom flight sports – mostly lower end sports based model sneakers coupled with Diesel products and a signless sneaker store next door to Joe Allens which had an ok selection of Nikes and Vans. However THE store most heads will be here for is Opium, a store almost solely dedicated to the Jordan brand. There are a few “dressier” Nikes but predominantly Jordans, a couple region exclusive colourways like these J1’s in Torquoise and many were no longer in production so it was a fine opportunity to see some classic history in the flesh. There were also a bunch of boxes stacked to the ceiling in the back corner, possibly new stock, possibly deadstock but we just couldn’t bring ourselves to even ask ):

Shinzo

SBPro

Espace Kiliwatch
Heading north west along Rue Etienne Marcel will lead you to Shinzo, SBPro and Espace Kiliwatch. Shinzo is probably the pick of the bunch for the slightly limited releases but take notice if there is any “cleaning” going on. Turns out if there is, you’ll be told they’re “closed for cleaning” and ushered out even if you had already been browsing for a good couple minutes. I however have a sneaking suspicion that it was just more French hospitality since we didn’t look like we were going to buy anything since their prices are hardly favorable. SBPro tries terribly to latch on to Nike’s SB skateboarding range, even to the extent of incorporating a Tick like symbol in their logo, they do however have a decent selection of skate related brands and products. Espace Kiliwatch is more like City Beach or Universal with a broader selection of casual brands and styles.

artoyz
Last stop in this area was Artoyz, the Giant Robot of Paris. As much as we love Kidrobot, it was refreshing to see fewer pieces from them. Instead there is a nice selection of toys and apparel from local (city and regional) artists and what can only be described as a Posca marker vending machine! Definitely has to be seen to be believed. Unfortunately prices again were bordering on cringe worthy.

Nike - Paris

Nike - Paris

Adidas - Paris
With a couple hours to spare we decided to make a pass on Paris’ Rodeo Drive, Av. Des Champs Elysees. If you’re like us and can’t fathom how someone could charge, let alone spend $100 on a ratty thin t-shirt then the only points of interest will be the Adidas and Nike flagship stores. Both encompass more than ample real estate for their location and both come complete with eye catching quirks, Adidas with its Trefoil live photo wall (your photo is taken webcam style and then displayed along with other customers from the day) and Nike with a Bill Bowerman (original co-founder) collage of button pins featuring Nike and sub brand logos to form a mural. In true French fashion, the Adidas store also has a separate section for its “designer” range which wouldn’t look out of place in Jay Kay‘s waredrobe 😉 Other than those few points, most of the range and styles are almost identical to those found in London.

Toyota

Toyota
While you’re here, check out the Toyota showroom, most notably for its open wheeled F1 style concept car and wall mounted Yaris. Across the road is the Louis Vuitton store, perfect op to add some photographic proof to that knock off bag purchase :p

Louis Vuitton
And we’re done! As they say, a quick game is a good game and we were out of there! Next and final stop, Beijing!
Travel tip: To get to Paris’ airport – Charles de Gaulle aka CDG, find a RER station and purchase a ticket from one of the machines.
Paris 2011 part #1 – Arrival
Paris 2011 part #2 – Sight Seeing

The Louvre - click for big
Carousel du Lourve
Most notable for its big glass pyramids and feature spot in The Davinci Code movie, it also plays host to a bunch of historic pieces like the Mona Lisa but personally the pyramids were the highlight for me, looking almost alien against the late setting sun. It also seemed like my work is never done being roped into doing group shot photos for a class of excursioning school students!

Arc de Triomphe
Arc de Triomphe
All roads may lead to Rome but in Paris it seems like they all lead to the Arc’. With 12 roads firing towards one helluva roundabout it makes the Normanby 5 ways look like a Macca’s drive-thru. Of course there’s also all the chaos and flinching that would come with no lane markings and European drivers.
Photo tip: For best photos and viewing of the Arc’ (and the crazy traffic), its better to get off a stop before Charles de Gaulle-Etoile eg. George V – especially late in the afternoon to get a nice glow on it from the sunset.

Eiffel Tower
Eiffel Tower
Even with the hours in the day dwindling, the good thing about those long upper Northern hemisphere days is everything stays open late, especially round tourist spots. Daylight till long after 10pm also gives you a little sense of security and a little more confidence when wandering to and from metro stops but do still keep your wits about you, places like the Eiffel Tower are notorious for thieves and scammers.
Travel tip: As always, keep all belongings on you or in your hands at all times. If you have to put something down like a handbag or backpack, stand one foot in the straps or stand on it if it’s a shopping bag or put it between your legs, this includes when you’re sitting down. At the very least this will slow them down if they try to swipe it. Thankfully it hasn’t happen to us but better to be safe than sorry right?
To top it off, this of course is Paris’ biggest and most famous landmark, it is a very bright candle for the tourist moths so there wont really be a time when the place is empty (even early in the morning) for you to have some picnic blanket time with your “main squeeze”. Different times of the day you may get less hawkers but in general be prepared to be bothered by at least 10 times in an hour by people trying to sell you stuff like cheap/rebottled warm champagne, wilted roses or take you on a “tour”. Another problem is the line to go up the tower… well the line for the tickets THEN the line for the tower. “9-11” style security exists here as well so be prepared for at least an hour of standing around. Even late at night the line was still snaking its way around the base of the tower. The couple food stores also had quite long lines. Prices are inflated with the usual tourist tax and you get your choice of baguette or… baguette. Ingredients were however fresh and it made for easy eating on the grass areas. If these few factors haven’t deterred you too much then its certainly worth it come 10pm when the tower lights up like a Christmas tree and “twinkles” against the sunset.
Photo tip: Check local guides for sunrise/sunset times as you will find sunset is around 10-10.30pm in May.

Sainte Chapelle
Sainte Chapelle church
Don’t know much about churches but love the architecture and massive stained glass windows then this is the place for you. Sainte Chapelle has the largest collection of 13th century stained glass anywhere in the world. Even with the on going restorations, 95% of the place is accessible and viewable. Getting in early is again the key as the lines form quickly as you compete with other tourists and school excursions. The downstairs section and entrance may seem a little lack lustre till you climb the narrow spiral staircase to enter the upper chapel…. And whoa, you can almost hear the angels singing. I’ll let the photos speak for themselves. Being essentially “just” a room, a budget of an hour or 2 will be more than enough time here.
Travel tip: The #4 Metro line will get you to the Cite’ stop with no problems, then its just a short walk. Entry fee is E7.50 Euros. Check the website for opening times as these vary through out the year.

Sainte Chapelle - downstairs

Sainte Chapelle

Sainte Chapelle - stain glass windows

Sainte Chapelle
Next up we pretend we have a platinum card, impractical taste in clothes and head to the shops!
Paris 2011 part #1 – Arrival
Paris 2011 part #3 – Shopping
Paris 2011 part #1 – Arrival

If you’re not staying near the airport (departure or arrival), the Eurostar is by far the most convenient way to get to Paris from London. Even though flights are short, the time and hassle with airport transfer eats into the total travel time …and your sanity. Since we stayed mere blocks from St. Pancras Station in London and like wise for the Grand Hotel de Paris (review here) from Gare du Nord, it was a short walk to and from both Eurostar stops. We’re not overly big history buffs so we budgeted 1.5 days in Paris for a highlights tour. Too tight a schedule for sight seeing AND shopping? Challenge accepted!

Eurostar
Travel tip: Purchase your Eurostar tickets well in advance, the closer to the departure date, the more expensive they become – if they’re available. Also note tickets take into account peak periods so there are different prices for different times of different days. Adjusting your trip dates to coincide with particular days can save you considerably. Eurostar also occasionally has sales, so keep an eye out for even more savings.

Rolling into Paris through a spaghetti maze of rail tracks and overhead lines I couldn’t help but to think of the Star Guitar video from the Chemical Brothers, cue loop. Heading from west to east we lost an hour with the time difference but the journey was surprisingly short and ride was bearable. We left London with the temps in the mid teens so it was a bit of a shock to arrive a few hours later to a muggy 27C.
Street signage is hit and miss and the once welcoming clearly visible landmarkers of “Underground” for the London Tube were completely non existent for Paris’ metro system. Some entry points were notable by their antique green garden fence styling but were difficult to spot amongst other bits of architecture of similar vintage. The ones that did have more visible signage was sadly only visible from front on so if you were a block or so away it was pretty tough to scan ahead to see if you’re at least heading in the right direction, b-bomm.
So it’s the city of lights, love and history… well it has lights, there’s things you’ll love and there’s plenty of history but if the only knowledge you have of Paris is from Meg Ryan spawned movies and stories from travel brochures, you will more than likely be sadly disappointed. Paris is like any other big first world city, its dirty, noisy, congested and polluted. Even in the short walk of a few blocks from the train station we encountered more shady ethnic types than last year in the Bronx or Brooklyn in NYC! But don’t let this discourage you, the history is certainly there with an abundance of sights to see and with the short stay we had, we had our work cut out for us.

Paris 2011 part #2 – Sight Seeing
Paris 2011 part #3 – Shopping

Hyde park is an oasis in the middle of the hustle and bustle of central London, very much like NYC’s Central park, a little unassuming from the street with a basic tree line but as soon as you step into it the traffic noise is all but muted to a distant ocean waves-like wash. A bit further in and its gone altogether and you’re left with the tranquil sounds of nature. One of the major features, other than the deck chairs 😉 is the waterways and lake. There are plenty of ducks and swans looking for a feed and paddle boats to go exploring. Other wildlife in the park like birds and squirrels are very tamed almost to the point you can hand feed them, not that we were silly enough to tempt fate and risk a scratch or bite.
As mentioned, deck chairs are available (for a fee) but there are plenty of free benches and a whole lot of lush grass to soak up the atmosphere and any sunshine that may be lurking between clouds.
Photo tip: there are plenty of gardens in the park with a variety of flowers, ornaments and water features. A mid range zoom macro lens would be the way to go or a dedicated macro for close up flower work.


On the southern end of the park, crossing over to Brompton Rd. you will come across a line of higher end stores which pave a path to one of London’s most famous centers for pompus-ity, Harrods. If you’re like us and can’t fathom or afford thousands of dollars (pounds) for a purse or a single piece of clothing then have a quick wander, admire the intricate architecture on the walls and ceilings then get out before security labels you as a homeless bum and tries to usher you out… you heathen. If however you’re after some exotic llama cheese or feel like paying 30 quid for a small box of early grey then this is the place for you. Don’t forget your £17BP enviro shopping bag to carry it all home in!
Jokes and insane prices aside, the food court area on the lower level would be the most interesting for most people. There’s a lot of gourmet items, some prepped ready to cook while others are ready to eat there and a wide selection of wines, condiments, deli produce and sweets.
Piccadilly Circus
If you’ve ever seen a movie with a scene in central London then more than likely you’ve seen Piccadilly Circus, well at least the giant TDK and Sanyo* sign. Adjacent memorial fountain is also a popular landmark which is located outside one of the few notable shops in this area, Lillywhites.

Lillywhites is a sports store and some what an institution especially in this location since it has been here since 1925. There’s 6 levels of sporting goods with a wide range of brands and styles, a lot at very reasonable prices and much of that on special. Being in this location of course attracts the tourist crowd so it gets rather cramped and a bit frantic at just about all hours of the day. If you find the last pair of sneakers in your size and the box is available, grab them and hold on to them even if you’re not 100% sure, otherwise prepare to feel the cold hard sting of regret moments later when they will be gone.
* – After about 25 years of this exact sign occupying this space, news is Sanyo wont be renewing its contract. By the time you read this it will more than likely read “Hyundai”.
Phototip: try and get there both during the day and at night for some vastly contrasting shots.
Well that about wraps it up for London. Next we don the beret, curly moustache, cigarette and baguette, board the Eurostar and head over land to Paris!
London 2011 part #1 – Arrival, Soho Shopping
London 2011 part #2 – Central London sight seeing
London 2011 part #3 – Chelsea Flower show
London 2011 part #4 – Shopping – Hammersmith
London 2011 part #5 – Shopping – Covent Garden and Soho
London 2011 part #6 – Shopping – Camden
London 2011 part #7 – Shopping – Shoreditch
London photo gallery here
Chelsea flower show photo gallery here

With a little time to spare we caught the black line from Chalk Farm to Old Street (just make sure you get the one going through Kings Cross, not Euston) to make a stop at an “in the know” sneaker collector spot Kazmatazz. Walking past, you’d be forgiven if you thought it was just one of those discount .99p stores with items stacked along its front window but on further inspection of the unpacked boxes and seemingly random grouping display, you’ll see a method to the madness with a lot of unique pieces of clothing and sneakers. A lot of items weren’t in multiple sizes or colours and quite a few I had never seen in the States let alone London or at all, another very good sign. On the down side, you would have to trust his taste and selection to really benefit from the “uniqueness” as some colourways and styles were questionable to say the least.

Kazmattazz
Watching, who I assume was the owner, stand firm against a middle age guy trying to haggle 60%+ off a pair of jeans was amusing to say the least. While firm with this guy, he was only to friendly to have a chat and point out new arrival stock to me. Chat a bit more and if you know what you’re talking about he may suggest you to have a look at the “good stuff out back/behind the counter”. From the quick look I had before he went back to Mr. Lowballer, it seems he may have access to a Tier 0/1 account and possibly a collector’s collection from the colourways and models I saw. Either way, stock was very limited, no idea on sizes but it would be one of those places where frequent visits would be required on the off chance you nab something you’ve been chasing.
Unfortunately with thoughts of overweight luggage looming, we left empty handed and headed down Bishopgate. Getting towards the business districts, it was eerily quiet on a weekend but a nice walk to see some stark contrasts of modern skyscrapers amongst period architecture. To cut across to Brick Lane, by pure chance we wandered down Brushfield St where we stumbled across the Old Spitalfield markets. While not huge, it still had quite a few rows of stalls, “classier” or more elegant styled arts and crafts, jewellery and hand crafted clothing sat amongst the market staples of novelty tees and souvenirs.

Arriving at Brick Lane was like walking into a music festival. Normally its full of expats and backpackers looking for the cheapest curry deals but come the weekend they’re looking for the cheapest of… just about anything else. The food stores still have their “hey buddy” “come have a look” staff on the street but towards the northern end, Dray Walk is where the random street vendors and market stalls start cropping up. The bulk of the stalls lie in the Old Truman Brewery building with the majority being at the cheaper low end of the market range. The selection of food definitely makes up for it, its just a matter of finding somewhere to sit (or stand) to eat it!

The surrounding lanes is where things look up a bit with a few nice boutique stores and Casio G Shock East store (pretty much identical stock to their West store). Prior research also revealed another sneaker spot called “Gloria’s” at shop 6 Dray Walk but I’ll be darned if we could find it! Quite possibly no longer existing or just wasn’t open on the day hiding behind one of the many vandalised rolla-doors.

Travel tip: We took the scenic (re: long) route down to Whitechapel station (Aldgate East is closer) but we did come across another JD Sports store which was perfect to grab a couple last minute items to fill the few spaces left in the suitcase. Moral of the story – JD Sports stores are everywhere so even if you miss one or change your mind there isn’t one too far away.
That’s just about it for our London visit, we wind down next with a spot of tranquility at Hyde park.


London 2011 part #1 – Arrival, Soho Shopping
London 2011 part #2 – Central London sight seeing
London 2011 part #3 – Chelsea Flower show
London 2011 part #4 – Shopping – Hammersmith
London 2011 part #5 – Shopping – Covent Garden and Soho
London 2011 part #6 – Shopping – Camden
London 2011 part #8 – Hyde park, Piccadilly Circus
London photo gallery here
Chelsea flower show photo gallery here
