
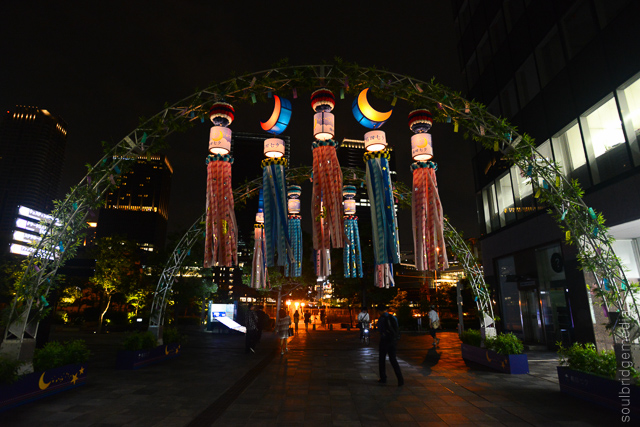
Two of Osaka’s most popular attractions happen to also be conveniently the two most central. The first being Osaka castle, only a few stops from Osaka station and a little bit of a walk.
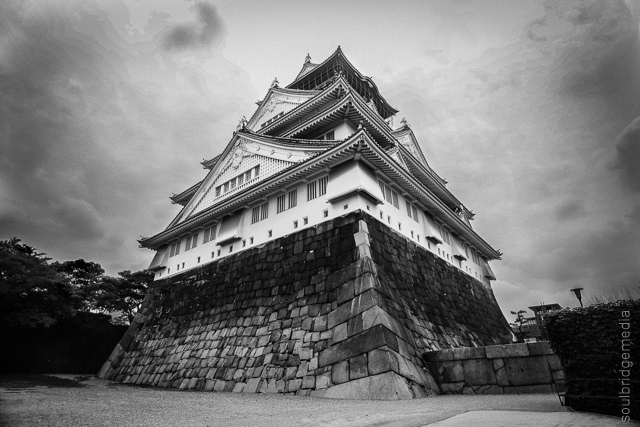
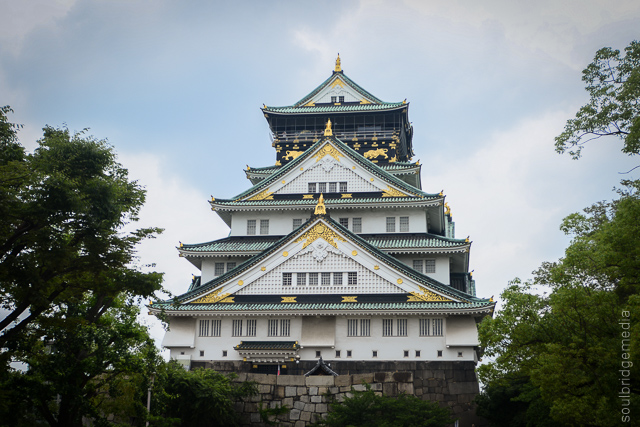
Osaka Castle
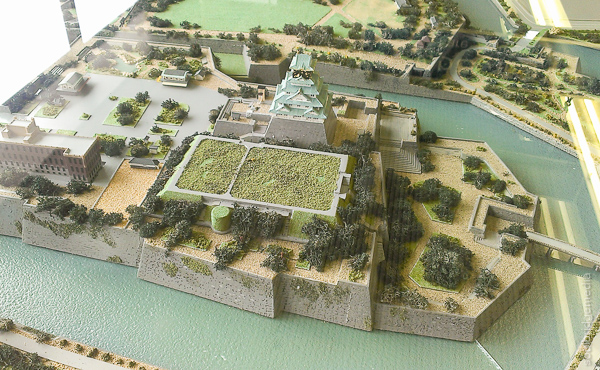
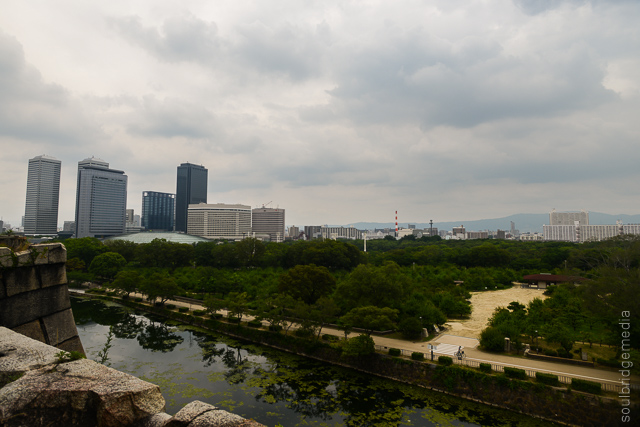
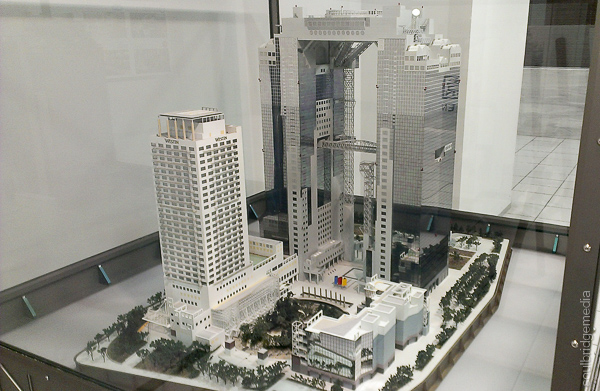
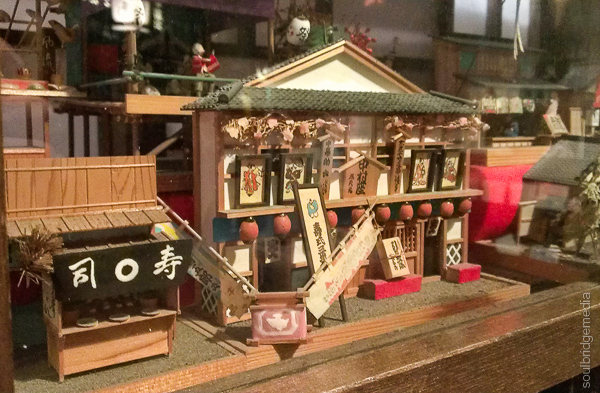
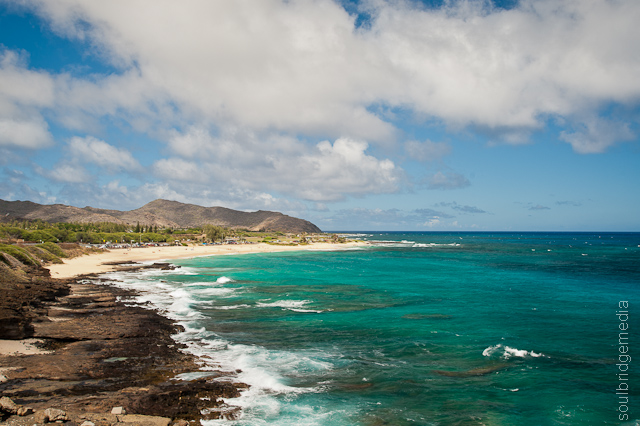
Its much of a muchness by train, regardless of what station you get off, however since we came from Osaka station we just had to stay on it till Osakajokoen station (check out the scale model of the grounds and castle in the foyer). From there its roughly a 1km walk past a lot of open concrete and numerous sporting facilities before you get to the park which has a lot of open spaces and waterways. The trees in the park are sakura (cherry bloosoms) which makes this a very common spot during the few weeks a year (usually late march/early april) when they bloom.
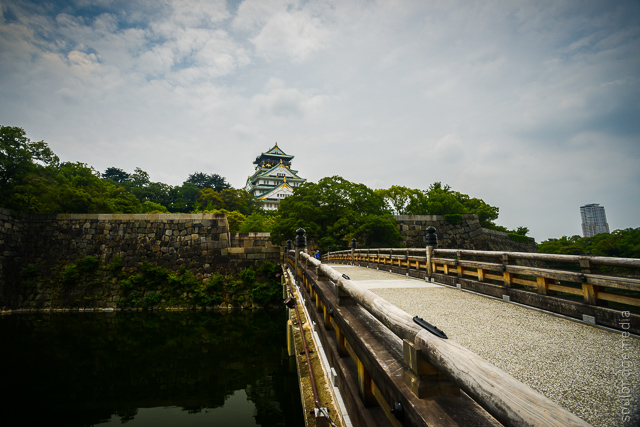
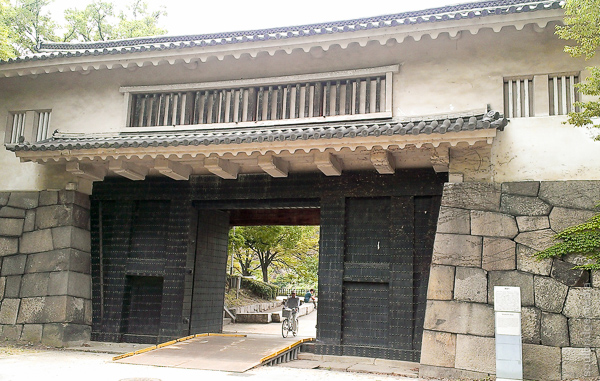
The foliage thickens and becomes almost a little rainforesty once you cross the bridge over the moat. This is where you catch the first glimpse of signs of a “fully functional” castle with battlements and large stone walls surrounding the water. There are also plenty of shaded spots where you can stop for a breather if you’re travelling during the unforgiving warmer seasons.

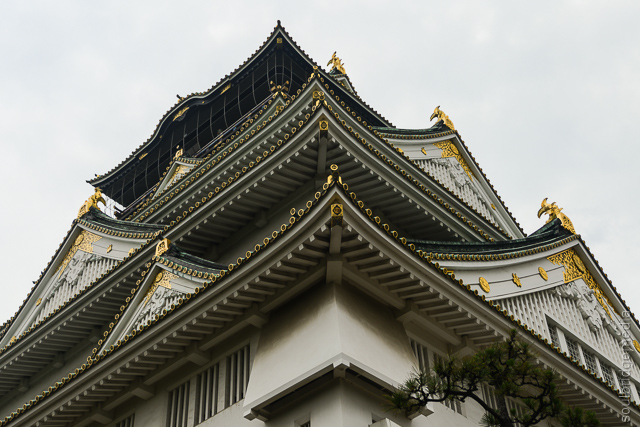
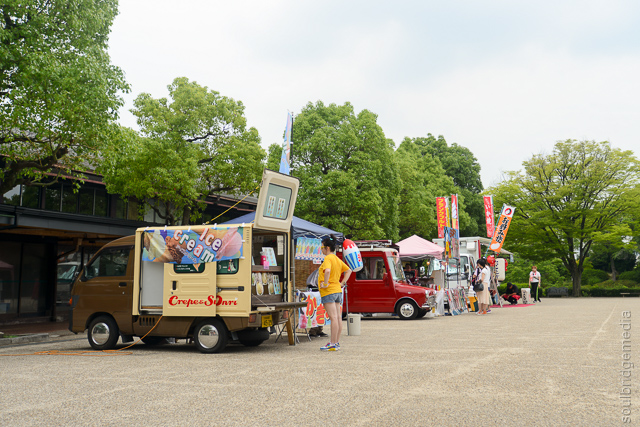
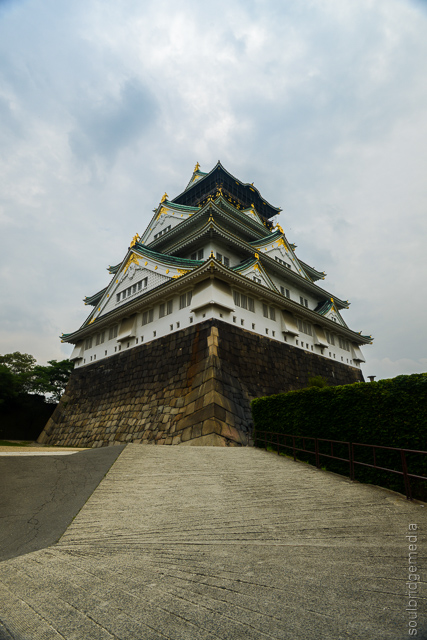
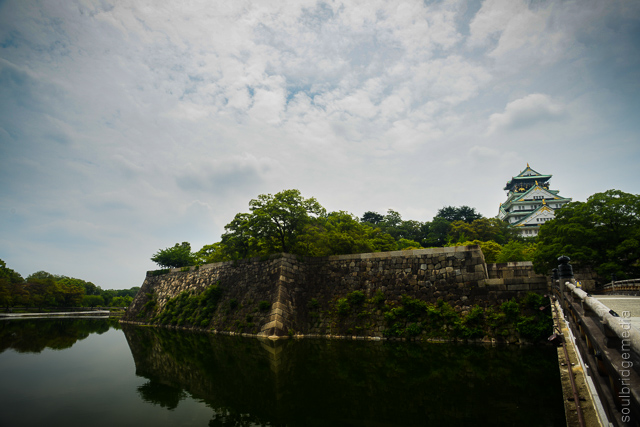
The castle sits majestically high above everything in the surrounding area upon its base of rock and stone and is trimmed with typical Asian rooftop styling and gold finishings. A large courtyard area sits at its base with a selection of vendors in cute little vans selling food and souvenirs. For the history buffs, entry into the castle is about 600Y and about 200Y for the greenthumbs that want to check out the castles extended gardens. Costumed guards frequently roam the grounds for your hashtagging pleasure.

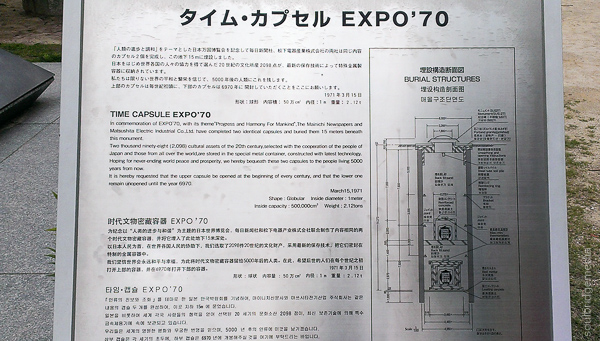

One thing you may not expect to see is a time capsule. Placed there in 1970 for the World Expo, it is built with two levels, the first to be opened every century and the second in the year 6970, probably by Cher.
—
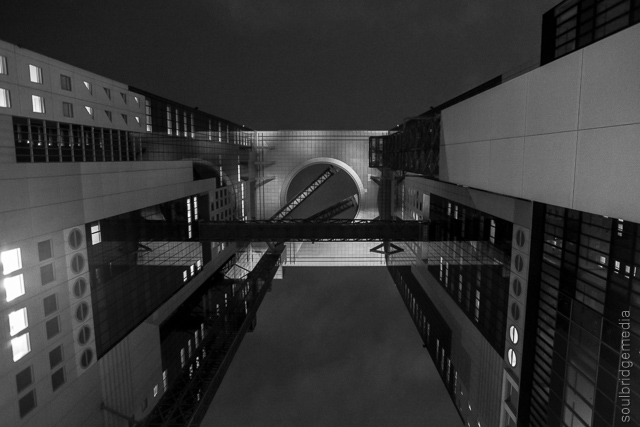
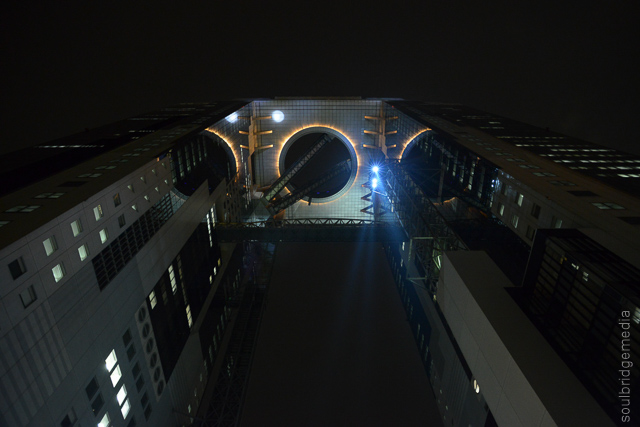
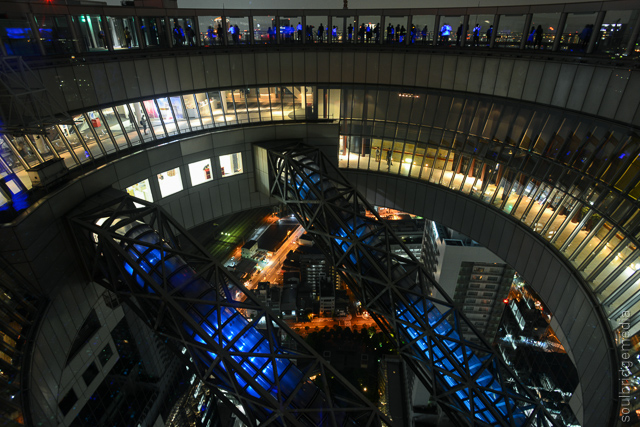
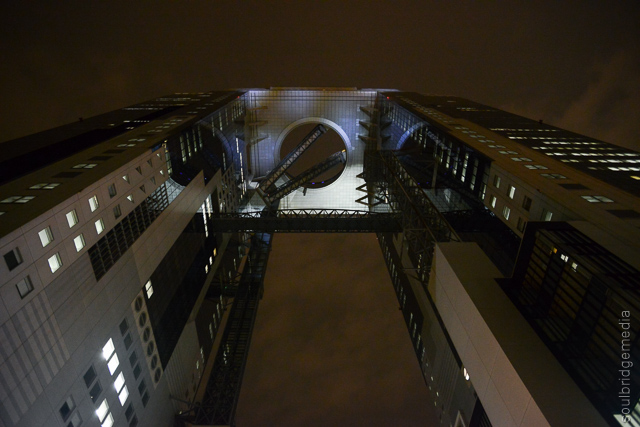
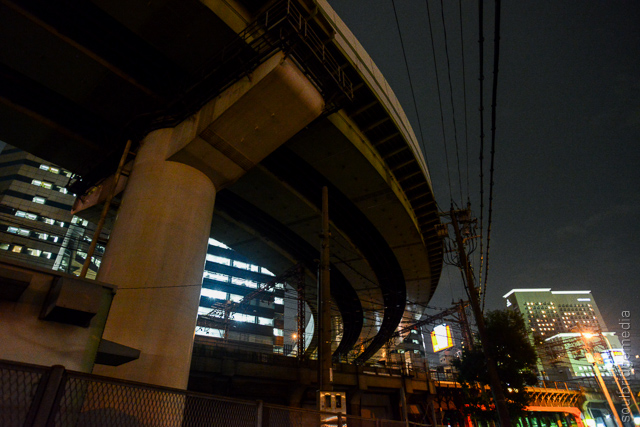
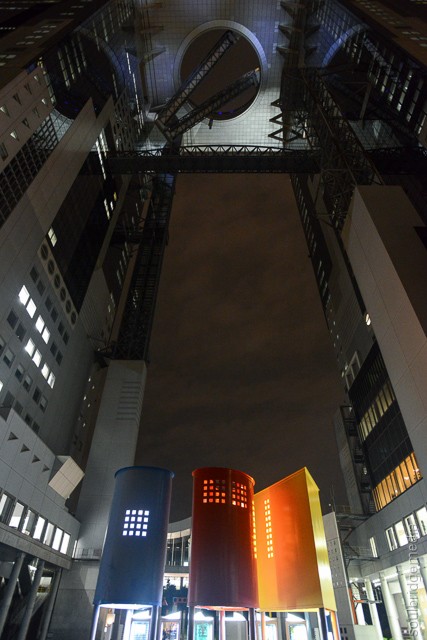
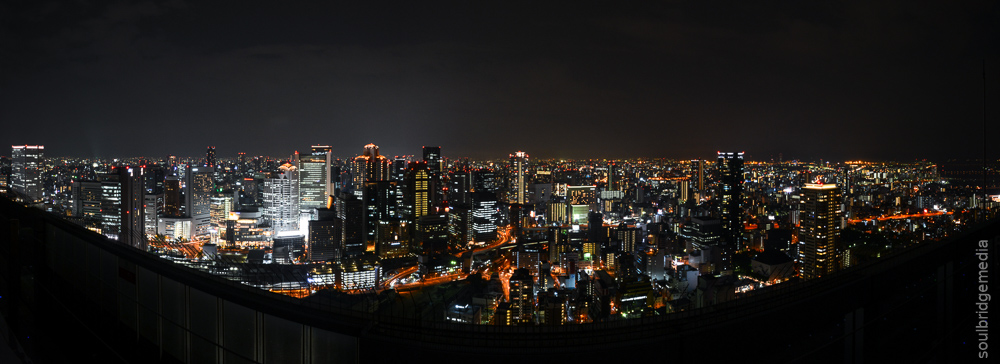
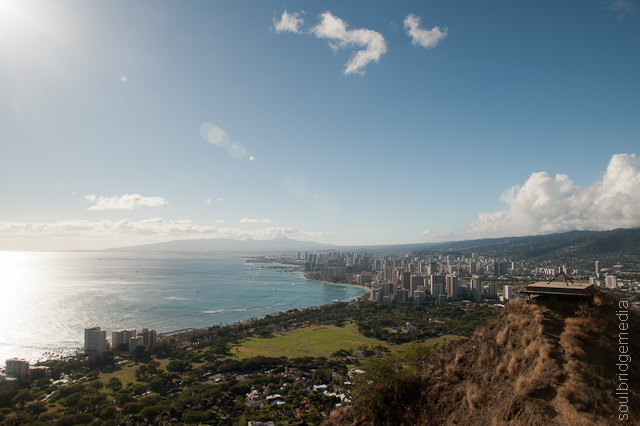
Umeda Sky building
Love going to “The Eye”’s around the world but hate the whole moving thing and still want a good view of the city, then this is the place for you!
Only about a 10min stroll from Osaka station (longer if you’re anywhere south of the station since you have to walk either around or through it and if you’ve been in Japan more than a minute you’ll know that’s not always as simple as it sounds!) but about 15-20min coming from our hotel via a few back streets for some random street photos.

Travel tip:
The English version of the website has nice simple to follow maps and venue information.
Even from several blocks away (or from our hotel’s external elevator) the Sky building looks menacing in a 90s scifi where the bad guy is the only rich person in the world kinda way.
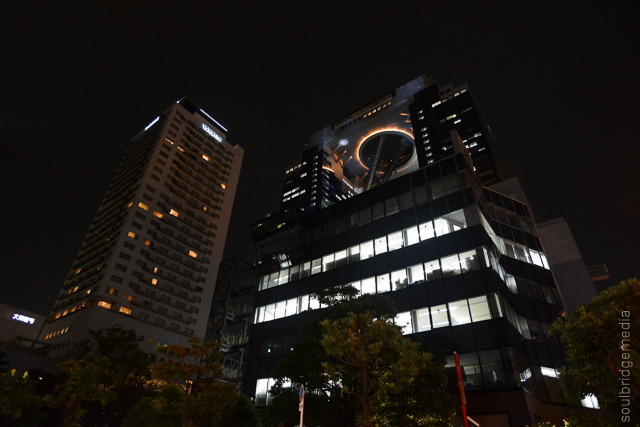
Photo tip:
If you’re going later in the evening, get your “from the ground” photos first as they turn off the upper lights before closing time, and check out the art installs while you’re at it
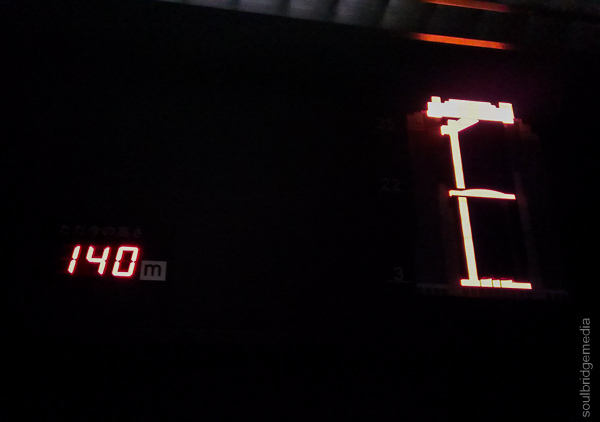
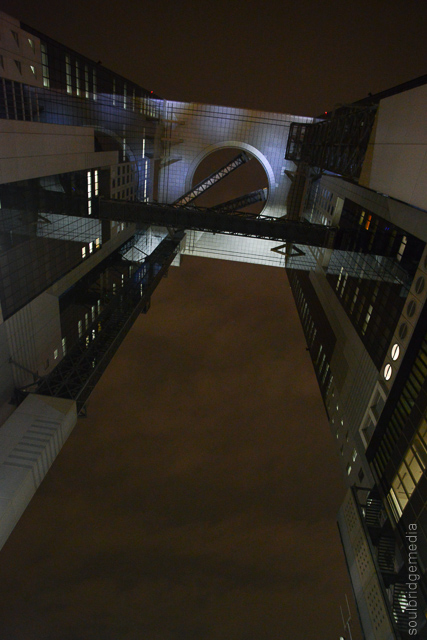
Like any building with an observation deck, there’s a bit of cueing and staring at elevator floor numbers clock over like it’s the pledged amount on a telethon but you’ll get to the deck in no time. The last section is up a see-through enclosed escalator before arriving at the closed-in viewing deck. This section would definitely be handy during the colder months or if you’re unlucky with the weather, it still offers decent views but if you don’t want the headache of taking photos from behind glass at night, head on outside.
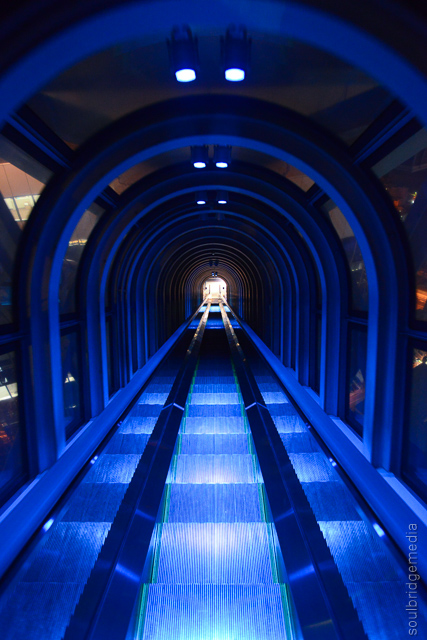
First impression, you will be forgiven if you think you’ve accidentally stepped into a 90s UV rave. UV paint splatters cover the ground while your white clothes and teeth glow in typical freaky fashion but thankfully this doesn’t detract too much from the view and more so the ability to take some nice photos!
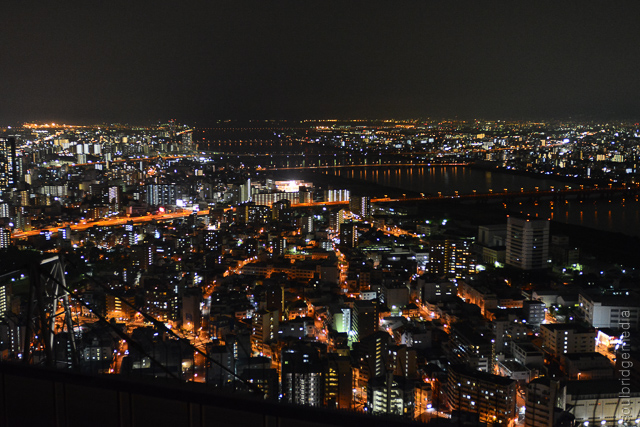
The deck offers almost 360 degree views of downtown Osaka and Osaka bay and even when busy, the crowd ebbs and flows enough that if you stand still you’ll eventually get any spot you choose.
Photo tip:
It’s not a cluttered skyline and the building sits high above anything near by so you may even consider a mid range zoom instead of a wide angle. Like most night shots, a tripod helps alot, even better if you can be bothered carrying something with some height to clear the barriers/railings. There will be plenty of others with the same idea as you so you may need to be patient with nabbing a good spot.
If you get bored or are waiting for a spot to free up, head to the “lumi deck” for a wall with lit up squares making different shapes, of course the very Sleepless in Seattle-esque heart shape is a clear winner for those thinking it could easily be the Empire State building. The fun continues inside with an interactive light room which… you guessed it, changes shapes and colours as you move like Elaine dancing.
Finally, after (or perhaps before) you’ve returned to ground level, there are several restaurants on the basement level that is themed in an “olden days” fashion not too unlike the Ramen Museum but most close well before the observation deck so get in earlier if you’re after some grub.
Next stop, the Osaka Aquarium!
If you have any questions on our travels, where to buy, what to do, hit us up on the Soulbridge media facebook page.
Japan 2013 part #1 – Arrival
Japan 2013 part #2 – Tokyo International Toy Expo
Japan 2013 part #3 – Gotemba – Premium Outlets mall
Japan 2013 part #4 – Tokyo – Studio Ghibli Museum
Japan 2013 part #5 – Tokyo – Kichijoji and Nakano
Japan 2013 part #6 – Tokyo – Akihabara
Japan 2013 part #7 – Tokyo – Tamiya HQ, Diver City
Japan 2013 part #8 – Yokohama – Zoorasia
Japan 2013 part #9 – Yokohama – Ramen Museum
Japan 2013 part #10 – Nissan HQ and Yokohama
Japan 2013 part #11 – Osaka – Nanba Shopping
Japan 2013 part #12 – Kyoto
Japan 2013 part #13 – Tokyo – Harajuku, Shibuya
Japan 2013 part #14 – Osaka castle, Umeda Sky building
Japan 2013 part #15 – Osaka Aquarium and Tempozan wheel
Japan 2013 part #16 – Osaka Universal Studios

For our final day, we wound things down starting with a relaxing drive out to Hanauma bay.
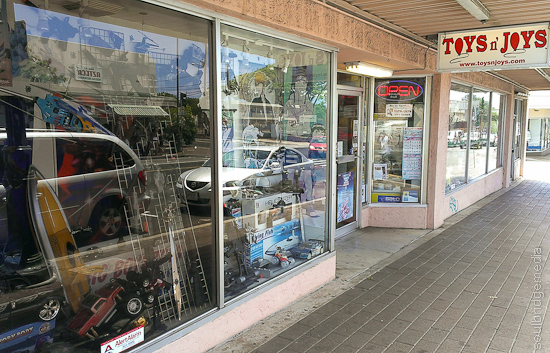
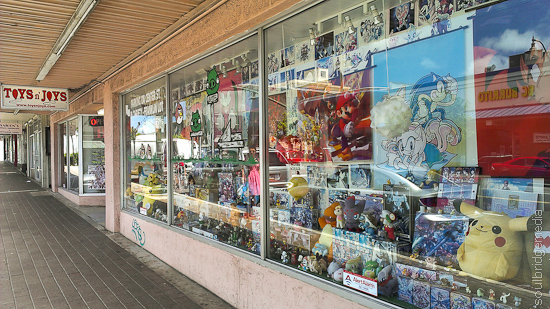
From Honolulu we took the Lunalilo Fwy to the Kalanianaole Hwy, it’s the most direct route and also runs through Kaimuki. Pretty much a blip on the map but it is home to Toys and Joys’ main store which if you had to make only one stop at a toy shop, this would probably be it. Prices were on the high side but the range and quantity of stock makes it a worthy stop for figures, games and RC gear along with the standard cutesy fair.
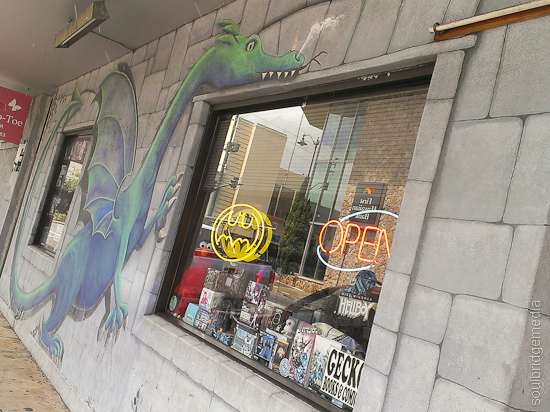
A block or two away there’s also Gecko Books and Comics (surprisingly pretty much no web presence!) which would definitely be up there as Oahu’s most extensive range of comics. They also have an eclectic range of collectibles, toys and games.


A few minutes down the road is the Kahala Mall. It’s a decent sized mall in a regional sense but nothing really of much note apart from Champs… and Pretzelmaker 😉
Onward along the Kalanianaole Hwy there are plenty of coves, boat ramps and sand bar lagoon areas, any of which would make a more than nice spot to stop for a cuppa, picnic or spot of sunning.
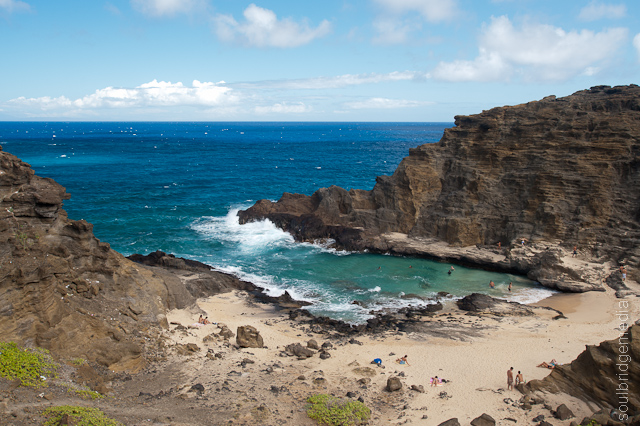
You know you’re getting close to the entry to Hanauma Bay when the traffic grinds to a halt and you guessed it, you see paid parking. The parking is up the top at the lookout, which if you want to venture down to the beach is quite a hike but thankfully there are (paid) shuttle buses to spare your legs.
The beach itself is actually a private beach so you will have to pay to play. Going by recent reviews, it used to be the place to go to for amateur snorkelling but now (no thanks to its popularity) the natural reef is almost none existent till a lot further out. Closer in, they have tried to regrow sections by mounting coral to plastic frames, not quite the same ambiance.
For us the best spot was up on the lookout points. There are several around the top of the bay all with its own merits but the center point to fully take in the bay’s horse shoe shape was a clear stand out. Add it to your list of things to do before or after bumping shoulders with other greased up tourists down on the beach.
Photo tip: online reports mention its well worth your while getting there for a sun rise… but of course that would mean getting up early. No easy feat when you’re on island time!
You can pretty much continue along the highway to explore more of the coastline which gives way to specklings of hidden secluded beaches and sweeping golden sand.
—
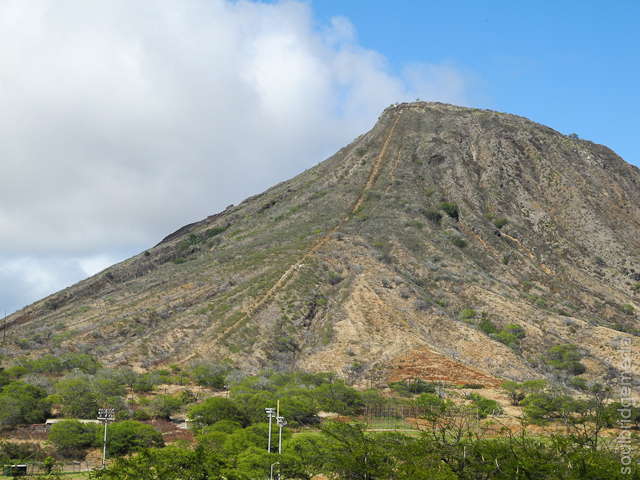
Diamondhead Crater
The crater is definitely one of the biggest landmarks on that side of the island. It’s clearly visible on take off or landing at HNL airport and always looming on the southern horizon. Its a short drive from Waikiki so it wouldn’t be a stretch to head out on a moped if that was your only mode of transport. The parking is, you guessed it, paid, $5 per car but this is entry to the park as well. You can avoid the fee by parking in the lower carpark but only if you’re prepared for a long uphill walk BEFORE you even get to the foot of the crater and you will still have to pay $1 per person if you arrive on foot.
The upper carpark is actually on the crater floor, here you’ll find restrooms, vending machines and the odd food truck. The hike to the lookout takes you up the inner wall of the crater to a south west point. If you’re reasonably fit and don’t dawdle it takes about 45min to get to the top (about 30min coming down).
Travel tip: Like any hike, make sure you have sturdy shoes, if you’re wearing heals, dressy shoes or thongs (flip flops) save yourself the blisters, stubbed toes, rolled ankles and whinging and just wait down the bottom. A fair portion of the track is very uneven with loose and jagged rocks, it would be even more treacherous in the wet. Depending on the time of day there is little to no shade so water and sunscreen is a also must.
Photo tip: There are a few places on the way up to take photos but they all pale in comparison once you reach the top. Save unpacking and repacking the slr till then.
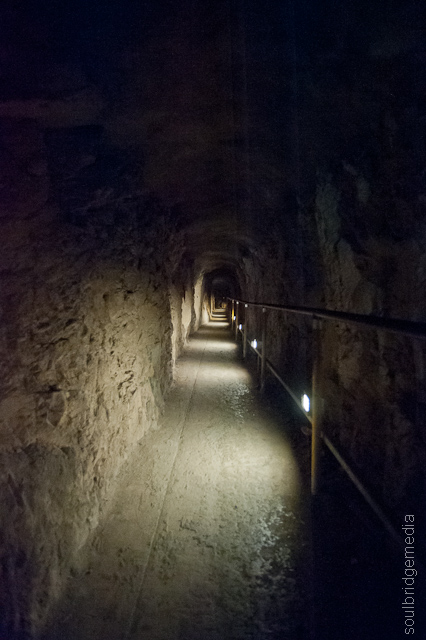
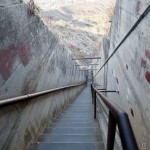
The “top” is actually one of a few large battlements which line the crater top. Being an outpost and early warning location for the USA you can just imagine the kind of artillery they would’ve had up here during the World Wars.
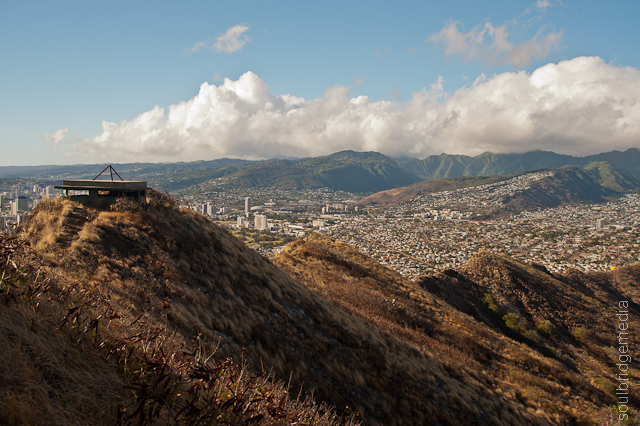
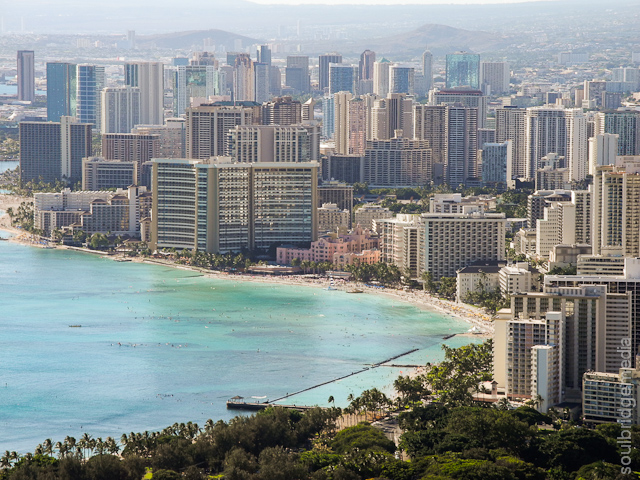
The view to say the least is well worth the climb. You can see the whole breadth of the island from Waikiki and Honolulu in the west through the central mountain range to off shore islands in the east. Get there at the right time and you’ll even catch the scheduled afternoon rain shower rolling in and an obligatory rainbows.

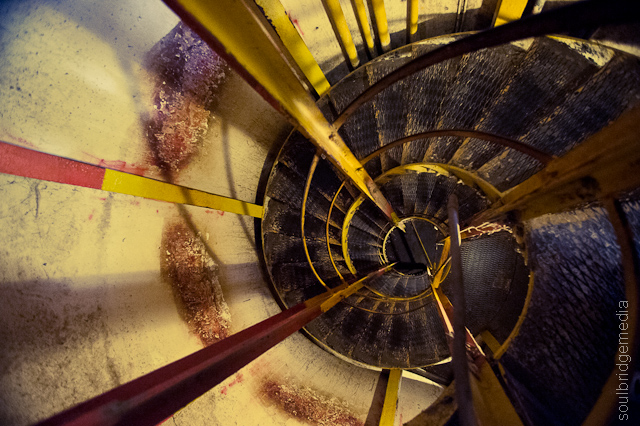
After some view savouring we took an alternate route and ventured down through the internal stairwell of the battlement, a little creepy but a lot cool. I’ll leave you to explore the area to find the entrance 😉
For those that are a gluten for punishment or want the ultimate downhill mountain biking rush, there’s THAT “hill” nearby.

And with that, another one of our adventures comes to a close further cementing our motto, overseas holidays are for doing stuff, relax when you get home!
ALOHA!
…and, Moshi moshi!
Yes I know its taken some time to get through these, more than a year again! Hopefully I’ll be able to find the time so you don’t need to wait as long for the next batch! Coming soon, Japan 2013! Tokyo, Yokohama, Osaka and Kyoto – highlights include the Tokyo International Toy Expo, Studio Ghibli, the Ramen Museum, Universal Studios Japan, outlet malls and more toy shopping than you can poke a 1:1 scale Gundam at!!
As always, if you have any questions about our adventures or where to buy something, just hit us up on the Soulbridge Media facebook page.
Hawaii 2012 part #1 – Arrival
Hawaii 2012 part #2 – Waikiki
Hawaii 2012 part #3 – Honolulu shopping – Part A
Hawaii 2012 part #4 – The Big Island – Volcano tour
Hawaii 2012 part #5 – Shopping Honolulu – part B
Hawaii 2012 part #6 – Tattoo Honolulu / Boardshorts: A Perfect Fit art exhibits
Hawaii 2012 part #7 – Pearl City area
Hawaii 2012 part #8 – Swap meets and Made in Hawaii festival
Hawaii 2012 part #9 – Cook offs and Car shows
Hawaii 2012 part #10 – North shore
Hawaii 2012 part #11 – Windward shore and Sealife Park
Hawaii 2012 part #12 – Chief’s Luau at Sealife Park
Hawaii 2012 part #13 – South shore – Diamondhead crater, Hanauma bay
So you’ve done the sight seeing and are down to your last day. What’s left to do? More shopping of course! With funds running low at the end of your trip, you can’t go wrong with sales and good ol fashioned bargain hunting and the place for it? Soho. Think of it as (if you’re in Brisbane) a West End, Stones Corner (before it when to crap) and Teneriffe/New Farm all rolled into one. Boutique stores aplenty, peppered with large clothing and shoe stores with great specials.

Dave's Quality Meats - NYC
Starting at the northern end around Bowery and 4th is Dave’s Quality Meat. Nope, not a butcher, but one of those fashion stores with an identity crisis. Unlike Johnny Cupcakes, the store is unfortunately not set up like a butcher, just your standard run of the mill clean and tidy boutique store style. They stock lines similar to that of other designer sneaker stores like Supreme and Undefeated with a selection of tees, fitted caps, watches and sneakers and like those other stores, nothing outside the normal range without a drop or quickstrike on the horizon.

My Plastic Heart - NYC
Further down Bowery St. on Forsyth is My Plastic Heart, a small store speicalising in collectible vinyls in the vein of Kidrobot. The day we were there was a day of a Sketchbot custom launch! However, this didn’t start till 6pm and the store was subsequently closed in preparation. Bummer!

Sketchbot Custom - My Plastic Heart - NYC
A couple more blocks south on Elizabeth st. is Classic Kicks, another smaller shop with a leaning towards skate wear but with a bit of spice, like the SSUR x DC collabo in the window. Unfortunately this too was closed. This leads me to remind you to check trading hours where possible, especially on the weekends. General rule of thumb though, most smaller stores open late in the morning and close later in the evening.

Classic Kicks - NYC
If you’re after a bite to eat head further south into Chinatown.
But what about the bargains you say? Why they’re all on Broadway, I reply. From about Grand st. up, there are clothing and electronic stores galore. Most I didn’t catch their names but they’re very hard to miss with their large display windows and “twofa” special tags. The most memorable would be Transit. Not just for its subway car and vintage turnstile at the back of the the street level but also for their great deals. Very similar to Dr. Jays but instead of going every brand under the sun, they’ve chosen the most popular and stocked a very worthy selection of each. Nothing too exotic by international standards but by domestic AU standards its more than sufficient for those stateside colourways and models.
The cherry on top is the aforementioned “twofa” deals. Basically you save $10-20US when buying 2 similar ticketed items. Some examples: 2 x Adidas Attitude highs = $50US, 2 x Nike Air Max 90 boots = $160US, 2 x Air Max 90 premium/Air Max Free = $140. The list goes on with Superstars, Jordans, Airforce 1s and more. There are similar bargains to be had in the way of street tees and jackets, check out the clearance rack at the back of the street level.
For more specialised clothing and even more sneakers, head down stairs to find another wall of sneakers, Nike apparel and a separate room dedicated to The North Face gear: hardshells, ski jackets, parkas, backpacks, bags and more.
Couple doors up is one of the nicest looking skate shops I have ever been in, Blades, coming across as more a higher end fashion store than a street clothing store. For more, skate orientated brands, this is a good stop, though, sneakers and caps are a bit limit. Head upstairs for skate and ski hardware and a small clearance rack.
Not too far off is another store with a wood finished exterior, missed the name of this one and thanks to the ancient (2007) version of Googlemaps, I can’t even find the building, let alone the name! Anyway, bargains galore none the less. Street level is clothing a plenty. Jeans, tees, jackets more in a street, sport vein than straight hiphop style but again some very reasonable prices. Downstairs is a whole floor of sneakers all at reasonable prices even without being on special. The clearance racks were a proverbial gold mine. Vintage styled KangaROOS complete with zip pocket for $9US?? Yep, we’ll take those.

KangaROOs sneakers
A side mention, a lot of adult sizing of American clothes can be way off with cuts especially in lengths. No doubt for all the ‘ballers and festivally plump types, but if you normally wear a medium, have a look in the kids or “big kids” section and try an extra large, they tend to fit very similar. This could be the difference of about $10US on tees and $20US or more on jackets.
Another note is a lot of these stores’ service is a bit hit and miss and the lines for the cashier can sometimes be very long (6 staff on the floor looking bored and only one on the register?? Riigghhtt..) so be prepared to chase them up if you find yourself waiting more than 5min for them to bring out your size shoe or for your items to make it to the counter.

New Era Caps Flagship store - NYC
Heading back up to 9th street, the New Era Flagship store is worthy of a look in even if its just to see the cool hidden drawers where all the caps are stored. In general they didn’t have too many rarities but they did have every colour of all their standard offerings as well as their EK series and snapbacks. They also have a good range of branded apparel and accessories for the discerning and meticulous owners. A nice little bonus from shopping there is all the caps come classily boxed and bagged, something you wont find at Lids. Lids however do have sales and multi-buy specials, so if by chance the Flagship store doesn’t have your size, they will be your next bet (easiest to find store is the Times Sq. one).

New Era Caps - NYC
Other stores of interest in surrounding blocks are Dr. Jays, Kidrobot, Tokidoki (which again disappoints in size and range, it seems TD stockists are still the better option for price and variety) and the Burton flagship store. For those that just cant buy “off the rack” sneakers, the Nike Sportswear Flagship store complete with Bespoke customising section is the place for you. Choose literally thousands of different colour and material combinations to create your one offs with the help from a Nike iD designer. Just remember you have a set time to design your shoe via an appointment, so some pre-thought wouldn’t go astray and its not like getting photos developed, you will have to wait a few weeks for them to be made.

Kid Robot - NYC
So that’s it folks! Our whirlwind stop in NYC. If you plan on hitting the other burroughs or travel upstate, then try and allow more than a week! NYC is also our last stop on our holiday. For highlights and photos from the other cities, see: Tokyo here and Los Angeles here.
Next on the agenda is a world tour set for later this year and of course there will be plenty of shopping and sight seeing tips and photos (:
San Francisco, Los Angeles, London, Paris, Beijing here we come!
New York City 2010 part #1 – The flight in…
New York City part #2 – Shopping: Midtown
New York City part #3 – Bronx Zoo
NYC part #4 – Sight seeing – Manhattan
NYC part #5 – Sight Seeing – Brooklyn Markets and Gardens
New York City photo gallery here

So you’ve shopped yourself silly and you’re tired of trekking for hours and not getting anywhere. Time for a bit of relaxing sight seeing, and if you do it right, a lot less wallet intensive.
If you’re staying in Times Square then its an obvious first stop. Try to see it during the day and night for some vast contrasts.
Photo tip: If you wish to get a less cluttered shot at night or some long exposures you’ll have to wait till after midnight, closer to 1am before the bulk of the crowd has left. Worth it to keep the weirdos from standing in the middle of your frame staring at you and messing up your shot.

Ferris Wheel - Toys R Us, Times Square
Our faves in Times Square were of course the Toys R Us and M&M’s World stores. Even if you’re not a fan of toys or chocolate, in which case you may want to consult your local physician, both stores are a must see and are conveniently open late. Toys R Us sports a full sized 60ft Ferris wheel, Jurassic Park T-Rex, Empire State Building Lego replica complete with King Kong, a life size version of Barbie’s two story doll house and many more comic and movie characters. There are also plenty of hands on demos and lollies/candy section.

Lego Buildings - Toys R Us, Times Square

M&M World Times Square
Across the way, is M&M’s World, which, you guessed it, competes with Hello Kitty for the title of the most licensed products. Tees, mugs, stationery to collectible NASCAR models and shower curtains, it if it has a space for a logo then you’ll probably find it here. Also see the great wall o candy and stay on the look out for the M&M characters. Say “wassup” to Blue for me (:
Just in case you didn’t get enough of a sugar fix, a couple doors down is the Hershey‘s store, for those that like their chocolate sweet AND salty. Considerably smaller but just as busy, Hershey’s has the same deal but with Kisses and Peanut Butter Cups instead.
A few blocks north is “Top of the Rock” which, as the name suggests, the top of Rockefeller Plaza (aka 30 Rock, yep, the TV show in which its filmed along with other faves like the “Today” show). Whether you go here or to the Empire State Building is more a personal preference. For us the pluses over ESB were:
– cheaper
– only one security check point
– lines and wait time were almost non-existent
– no additional fees to go to higher levels
– no crazy stair climbing
– 1 enclosed and 2 open air levels
– only a couple stories shorter than the ESB (completely unnoticeable when you’re up there)
– the view is the same
– you get to see and photograph the ESB (frame it right and you can get the Statue of Liberty or Brooklyn bridge in there as well)
Try and get there about an hour or 2 before sunset to beat the rush, find a nice spot and watch the sunset and the city light up. We were fortunate to have decent visibility when we went, but like any big city, be prepared for smogged out days with dirty brown sunsets.
Regardless of which vantage point you chose remember its really high up so as soon as the sun sets it can get quite cool, so bring a jacket. Times 2 plus beanie and gloves if its in the cooler months.

NYC view north from "Top of the Rock" (click for big)

NYC view south from "Top of the Rock" (click for big)
If you chose ESB, you’ll only be a couple blocks away from Grand Central station. The location of many a movie scene’s meeting point, abandonment and “we’ll lose em here” ‘s. Check the Sky Ceiling in the main concourse for zodiac art painted by Frenchman Paul Helleu.

Main Concourse - Grand Central Station, NYC (click for big)
If you want to jump on a train then this is the place to do it, there’s a line that will take you pretty much anywhere and on the chance that you rush and catch the one heading in the wrong direction its only a matter of getting off at the next stop and crossing to the other side of the platform, just make sure your Metro Card is topped up.
One stop that may not immediately ring any bells is Bowling Green, right near Battery Park on Manhattan‘s southern tip. Here you can have a relaxing day in the park, no doubt very popular in the warmer months with is sea side location, but for us it was to take the short walk to the South Ferry Terminal for the Staten Island ferry to see the Statue of Liberty.
Now you can easily spend big bucks for the countless tours to see the ol’ girl but at a cost of not just money but time in queues and security, not to mention when you get there, Liberty Island (the island its on) is very small, so photos are all upskirts and internal access is limited, so no, you cant climb into the crown and blast Jackie Wilson, Ghostbusters 2 styles. Another misleading note from the same movie is the misconception of its actual size. Its less than 50m high so its not Godzilla or even the Stay-Puff man.
That aside, if you want the cheapest and least competition from other tourists, then the Staten Island ferry is the way to go. It’s a commuter ferry so mostly business/everyday types. We had no problem getting a spot for some photos on either the front or back decks.
Photo tip: Leaving Manhattan the statue is on your right (starboard) side. Take a long lens for a nice tight level crop
Not long ago, you could actually stay on board the ferry and just wait for it to “reverse” back to Manhattan, however now they ask everyone to disembark. Make sure you don’t leave the terminal otherwise you will have to pay, instead just circle back round to the entrance side. If you got a couple minutes to kill, grab a bite to eat in one of the eateries or fresh fruit vendors in the terminals. If not, don’t sweat it, there’s food (and beer) available on board the ferry.

Statue of Liberty
Back on the mainland, head back to Fulton St. station to visit the World Trade Center.
That whirlwind run was all we had time for in Manhattan before we hitched a subway ride to Brooklyn.
New York City 2010 part #1 – The flight in…
New York City part #2 – Shopping: Midtown
New York City part #3 – Bronx Zoo
New York City part #5 – Sight Seeing – Brooklyn Markets and Gardens
New York City part #6 – Shopping: Soho
